
⚠️ Emergency Triage: You Have a $200+ Plant in Critical Condition
If you’re reading this, your Monstera Thai Constellation is showing signs of root rot—and you’re in panic mode.
We understand. A dying Thai Constellation isn’t just heartbreaking—it’s a significant financial loss. These rare variegated cultivars cost $150-$400+ depending on size, and watching those cream-splashed leaves yellow and collapse feels devastating.
Here’s the reality: Root rot moves fast. From first symptoms to total collapse can take as little as 7-14 days. But if you’re catching this now—within the critical window—there’s a 70-85% survival rate using The Urban Lab’s Emergency Surgical Protocol.
This isn’t a “spray some cinnamon and hope” guide. This is a clinical, step-by-step rescue procedure developed through actual case studies with high-value Monstera specimens. Let’s save your plant.
📋 Emergency Protocol Timeline
Phase 1: Clinical Diagnosis — Is This Actually Root Rot?
Before you panic-cut anything, confirm the diagnosis. Not every yellow leaf means root rot.
Monstera Thai Constellation naturally sheds older leaves, and the variegated sections can develop brown edges from low humidity. Root rot is different—it’s systemic, rapid, and has unmistakable physical symptoms.
Definitive Root Rot Symptoms (3+ confirms diagnosis)
- Mushy, black/brown roots: Healthy Monstera roots are firm, white to tan. Rotted roots are soft, discolored, and fall apart when touched
- Foul, sulfurous odor from soil: Anaerobic bacteria (Pythium, Phytophthora) produce hydrogen sulfide gas—smells like sewage or rotten eggs
- Stem softness at soil line: Press gently at the base where stem meets soil. Rot spreads upward from roots—if stem feels squishy, infection is advanced
- Rapid yellowing of lower leaves: Not gradual aging—multiple leaves yellowing within 3-7 days despite adequate light
- Wilting despite wet soil: Plant looks thirsty but soil is saturated. Dead roots can’t absorb water, creating false drought stress
- Leaf edema (bumps/blisters): Raised corky spots on underside of leaves from pressure imbalance when roots fail
⚠️ Don’t Confuse With Normal Variegation Issues
These are NOT root rot:
- Brown crispy edges on white variegation: Low humidity or mineral buildup—not rot
- One older bottom leaf yellowing slowly: Natural senescence—plants shed old leaves
- Small brown spots on green tissue: Usually physical damage, sunburn, or thrips damage
- Aerial root browning: Aerial roots naturally cork over and turn brown—completely normal
The 60-Second Unpot Test
If you suspect root rot, you need visual confirmation. No amount of guessing from above-soil symptoms is sufficient.
Gently slide the plant out of its pot. Don’t pull from the stem—tip pot on its side and tap the bottom to release the root ball.
What you’re looking for:
- Healthy roots: White to light tan, firm, smell earthy/fresh
- Infected roots: Dark brown to black, mushy, slimy coating, strong foul odor
If more than 30% of roots are brown/mushy, proceed immediately to Phase 2. Time is critical.
Phase 2: The Surgical Protocol — Root Removal & Wound Management
This is the most critical phase. Your goal is to remove 100% of infected tissue while preserving as much healthy root mass as possible.
Half-measures fail. Leaving even small pockets of infected tissue allows pathogens to recolonize within 3-7 days.
Materials Required
- Sharp, clean scissors or pruning shears — Dull blades crush tissue and spread infection
- 70% isopropyl alcohol — For sterilizing tools between cuts (spray bottle ideal)
- 3% hydrogen peroxide (H₂O₂) — Standard drugstore concentration for root sterilization
- Large bowl or bucket — For hydrogen peroxide soak
- Clean water source — Lukewarm tap water for rinsing (distilled if available)
- Paper towels or clean cloth — For drying and inspecting roots
- Disposable gloves (optional) — Pythium and Phytophthora don’t infect humans but prevent cross-contamination to other plants
Step-by-Step Surgical Procedure
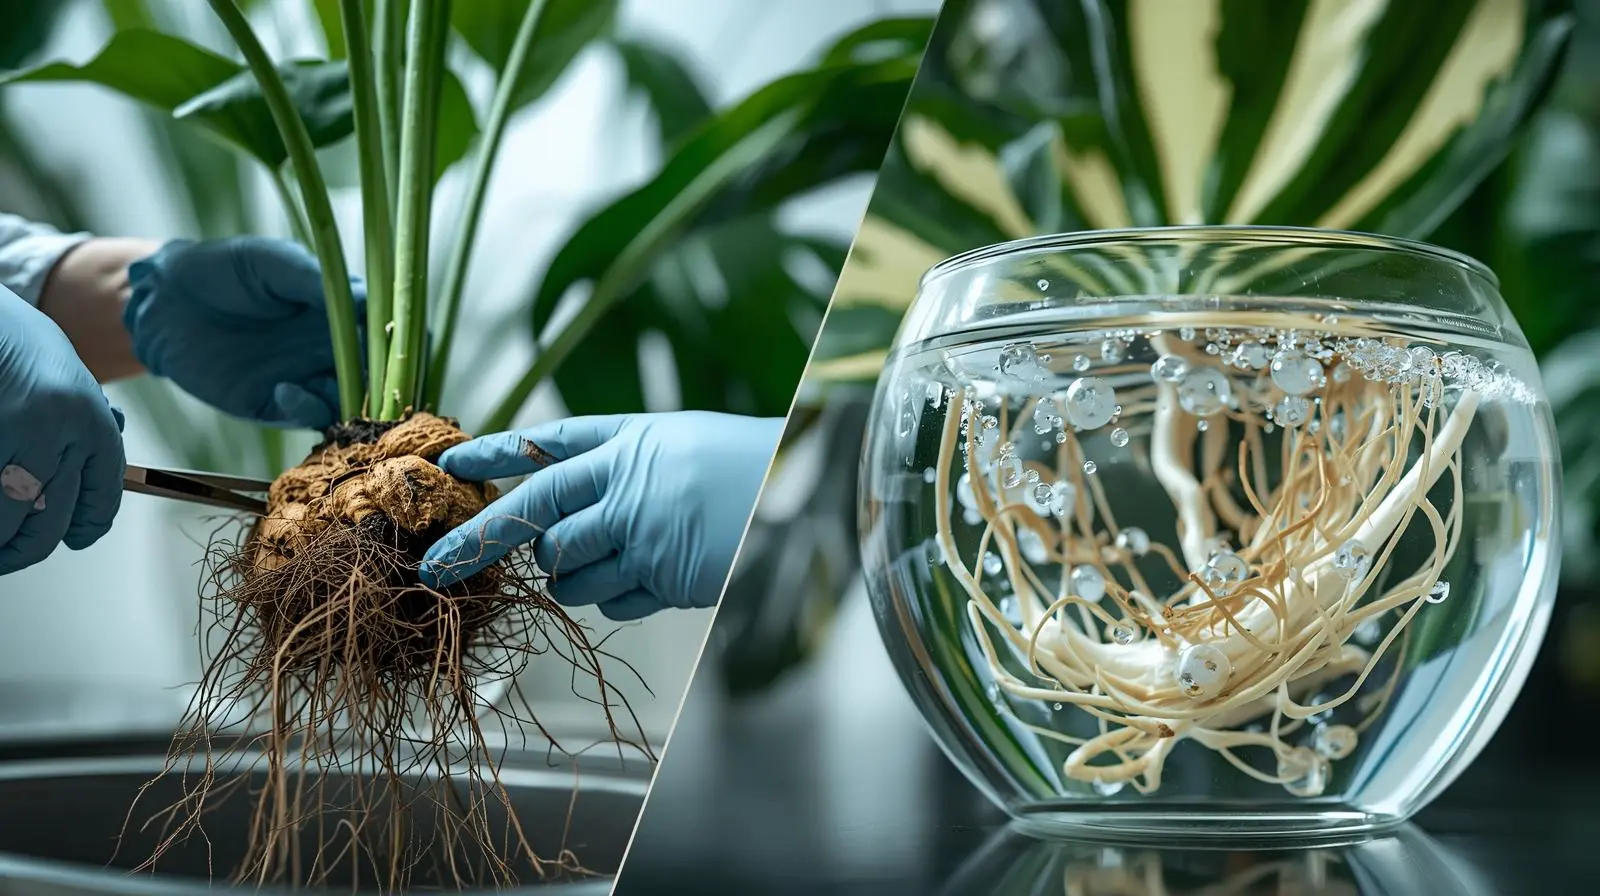
- Complete soil removal: Take plant to sink or outdoor area. Gently shake and brush away all soil from roots. Don’t be gentle here—you need to see every millimeter of root tissue. Old soil harbors pathogens and must be 100% removed.
- Rinse under lukewarm running water: Hold root ball under gentle stream of lukewarm water (20-25°C/68-77°F). Use fingers to massage and separate roots. This reveals the true extent of damage—what looks savageable dry may be mush when wet.
- First visual inspection: Lay plant on clean surface. Identify the boundary between healthy (firm, white/tan) and dead (soft, brown/black) tissue. You’re looking for the infection margin.
- Sterilize cutting tools: Spray scissors/shears thoroughly with 70% isopropyl alcohol. Let air dry 10 seconds (don’t wipe—wiping reintroduces contamination).
- Surgical removal of infected roots: Cut away all brown/black mushy roots. Make clean cuts—no tearing. Cut back to firm, white tissue even if this means removing significant root mass. Critical rule: When in doubt, cut it out. Leaving 1 cm of infected tissue can restart the entire infection cycle.
- Re-sterilize between cuts: Every 3-5 cuts, re-spray tools with alcohol. This prevents spreading pathogens from infected to healthy tissue via contaminated blades.
- Check stem base: Examine where roots meet the main stem. If stem tissue is brown/soft more than 1 cm above the root zone, the plant may not be salvageable. If stem is firm and green/white internally, proceed.
- Final inspection: You should be left with only firm, white/tan roots. If any roots feel spongy or have brown streaks inside (cut one open to check), remove them. Better to have 3 healthy roots than 10 questionable ones.
⚠️ When to Make the Difficult Call
Sometimes a Thai Constellation is too far gone. If you encounter these conditions, survival odds drop below 20%:
- Less than 10% healthy root mass remaining — Plant can’t support existing leaf mass
- Main stem rot extending 3+ inches above root zone — Systemic vascular collapse
- All growth points (nodes) are brown/mushy — No viable tissue for regeneration
- Complete root system loss in plants with 5+ mature leaves — Energy demands exceed re-rooting capacity
In these cases: Consider taking stem cuttings from any healthy sections above the rot zone and rooting them separately. This salvages genetics even if the mother plant can’t be saved. See our guide on emergency propagation from diseased Monstera.
Phase 3: Chemical Sterilization — The Hydrogen Peroxide Protocol
You’ve removed visible rot, but microscopic pathogens remain on surviving roots. Without sterilization, reinfection is almost guaranteed.
Hydrogen peroxide (H₂O₂) is your solution. It’s a powerful oxidizing agent that destroys anaerobic bacteria and fungi like Pythium and Phytophthora—the primary root rot pathogens.
The Chemistry: Why Hydrogen Peroxide Works
When H₂O₂ contacts organic tissue, it rapidly decomposes into water (H₂O) and reactive oxygen species (ROS). These oxygen radicals oxidize the cell walls of anaerobic pathogens (which can’t tolerate oxygen), causing cell lysis and death.
Crucially: At 3% concentration diluted 1:2 with water, H₂O₂ kills pathogens without damaging healthy plant cells. The exposure time and concentration are calibrated for maximum pathogen kill with minimal plant stress.
This is the same principle used in commercial greenhouse pathogen management according to University of Minnesota Extension research.
The Sterilization Procedure
💧 HYDROGEN PEROXIDE DIP PROTOCOL
Preparation:
- Fill large bowl or bucket with 2 cups (475ml) clean water
- Add 1 cup (237ml) 3% hydrogen peroxide (standard drugstore concentration)
- Mix gently—you now have a 1:2 dilution (final concentration ~1%)
Application:
- Submerge entire root system in H₂O₂ solution
- Gently agitate roots to ensure all surfaces contact solution
- Soak for exactly 10 minutes (set timer—don’t guess)
- You may see bubbling/fizzing—this is normal (oxygen release from pathogen oxidation)
Post-Treatment:
- Remove plant from solution
- Rinse briefly under clean water (optional—H₂O₂ breaks down rapidly to water anyway)
- Gently pat roots dry with clean paper towel
- Allow to air dry for 15-30 minutes before re-potting or water rooting
⚠️ Hydrogen Peroxide Safety & Common Mistakes
DO NOT:
- Use concentrations above 3% — Industrial 6-12% H₂O₂ will burn healthy tissue
- Soak longer than 15 minutes — Extended exposure damages root tip meristems
- Apply undiluted H₂O₂ directly to roots — Always dilute 1:2 with water first
- Reuse H₂O₂ solution — Pathogen-contaminated solution can reinfect plant
Storage: Keep H₂O₂ in original brown bottle away from light. Light causes rapid decomposition—clear bottles render it ineffective within weeks.

Hydrogen peroxide sterilization showing oxidation bubbles killing anaerobic pathogens
Phase 4: ICU Rehabilitation — Re-Rooting in Sterile Medium
Here’s where most rescue attempts fail: After all that work, growers put the Thai Constellation back into soil.
This is a death sentence. Your plant just survived major surgery and has a compromised root system. Soil—even “fresh” soil—contains billions of microorganisms, including potential pathogens. A weakened plant can’t fight off reinfection.
The solution: Re-root in a completely sterile, oxygen-rich medium until the root system fully regenerates.
Rehabilitation Medium Options (Choose One)
✅ Option 1: Sterile Perlite (Recommended for Beginners)
Why it works: Perlite is an inert volcanic glass—completely sterile, provides maximum oxygen to roots, retains some moisture without waterlogging.
Setup:
- Fill clear container (plastic cup, nursery pot) with coarse perlite
- Moisten perlite with distilled or filtered water—damp, not soaking wet
- Insert plant, ensuring at least 2-3 inches of stem in perlite for stability
- Water when top inch of perlite dries (typically every 3-5 days)
- New roots visible through clear container within 2-4 weeks
Advantage: Easy to monitor root growth through clear container walls.
✅ Option 2: Sphagnum Moss (Best for Plants with <5 Remaining Roots)
Why it works: Sphagnum moss is naturally anti-fungal (contains sphagnan compounds), holds moisture consistently, provides physical support to weak stems.
Setup:
- Use long-fiber sphagnum moss (not peat moss—different product)
- Soak moss in distilled water for 10 minutes, then squeeze out excess until just damp
- Wrap remaining roots and lower 2-3 inches of stem in moss
- Place wrapped plant in container (moss should not be compressed—keep it fluffy for air pockets)
- Re-moisten moss when it feels dry to touch (every 2-4 days)
- New roots emerge into moss within 3-6 weeks
Advantage: Highest success rate for severely compromised plants. For detailed sphagnum propagation techniques, see our complete moss rooting protocol.
✅ Option 3: Aerated Water Culture (Advanced/Best Oxygen Delivery)
Why it works: Water provides 100% humidity to remaining roots while airstone delivers constant oxygen, preventing anaerobic conditions that cause rot.
Setup:
- Use clean glass jar or vase filled with distilled/filtered water
- Add aquarium airstone connected to air pump (runs 24/7)
- Optional: Add 1-2 drops liquid fertilizer at 1/4 strength for nutrient support
- Position plant so only roots (not stem) touch water—use jar rim or foam collar for support
- Change water weekly to prevent bacterial bloom
- New roots grow rapidly in water—visible within 7-14 days
Advantage: Fastest root regeneration (50-100% faster than perlite). Disadvantage: Requires equipment and daily monitoring. This is called the Kratky method for passive hydroponics.
Critical ICU Care Requirements (All Methods)
Regardless of rooting medium, follow these non-negotiables:
- High humidity (70-85% RH): Damaged roots can’t deliver water to leaves efficiently. Increase ambient humidity with humidifier or enclose plant in clear plastic bag (tent method). Remove bag 10 minutes daily for air exchange.
- Bright indirect light (no direct sun): Plant needs energy for root regeneration but can’t handle stress of direct sun. Place in east-facing window or 3-5 feet from south/west window.
- Stable temperature (21-26°C / 70-78°F): Avoid temperature swings—root growth stalls below 18°C (65°F).
- Zero fertilizer for first 4 weeks: Don’t feed until you see active new root growth (white root tips 1+ inch long). Fertilizing too early causes salt stress on compromised roots.
- Monitor daily: Check for new root emergence, leaf stability, and any signs of continued decline (additional yellowing, stem softening).
📊 Recovery Timeline: What to Expect
| Week | Expected Progress | Action Required |
| Week 1-2 | Stabilization phase. May lose 1-2 more leaves (normal stress response). No visible root growth yet. | Maintain humidity, monitor daily, do NOT fertilize |
| Week 3-4 | First white root tips emerge (water method fastest, perlite/moss slower) | Continue current care. Begin 1/4 strength fertilizer once roots are 1+ inch |
| Week 5-8 | Rapid root growth phase. Root system reaches 50% of pre-rot volume. Existing leaves stabilize. | Increase fertilizer to 1/2 strength every 2 weeks. Reduce humidity slightly (60-70%) |
| Week 9-12 | Full recovery. New leaf growth resumes. Root system robust enough for soil transition. | Transition to chunky aroid soil mix (see prevention section). Resume normal care. |
Success Indicator: When you see consistent new leaf unfurling AND root system fills container, your Thai Constellation has survived. Total recovery time: 8-16 weeks depending on severity.
Prevention Protocol: Never Let This Happen Again
Once you’ve saved your Thai Constellation, the next step is ensuring this never happens again.
Root rot isn’t bad luck—it’s the result of specific, preventable conditions. Fix these, and your plant will thrive for decades.
The Root Cause: What Actually Causes Root Rot
Root rot develops when three conditions converge simultaneously:
- Waterlogged substrate: Soil pores filled with water instead of air
- Anaerobic conditions: Lack of oxygen in root zone
- Pathogen presence: Pythium, Phytophthora, or Rhizoctonia spores in soil
Remove any one of these factors, and root rot cannot develop. Your prevention strategy targets all three.
Fix #1: The Substrate Formula
Never use standard potting soil for Monstera Thai Constellation. The peat-based, moisture-retentive mixes sold for “houseplants” are designed for terrestrial plants like Pothos, not aroids.
Thai Constellation is an epiphytic climber. In nature, its roots grow on tree bark with near-constant air exposure. Replicating this requires a chunky, fast-draining substrate.
| Component | Ratio | Function |
| Orchid Bark (Medium Grade) | 40% | Structure, drainage |
| Perlite or Pumice | 30% | Aeration, porosity |
| Coco Coir or Peat | 20% | Moisture retention |
| Worm Castings or Compost | 10% | Slow-release nutrients |
Critical: This mix drains 80% of applied water within seconds. The remaining 20% is held in micro-pores for roots to access. Large air spaces prevent anaerobic conditions—no oxygen starvation, no rot. For complete substrate science, see our master aroid substrate guide.
Fix #2: The Watering Protocol
Overwatering is the #1 cause of Thai Constellation death. But “overwatering” doesn’t mean watering too frequently—it means keeping substrate saturated too long.
With the chunky substrate above, you physically cannot overwater by frequency. The mix drains so fast that roots get water + oxygen simultaneously.
The Rule: Water when top 2-3 inches of substrate are dry. Stick your finger in—if it feels moist, wait another 2-3 days. In practice, this means watering every 7-14 days depending on temperature, humidity, and light intensity.
How to water correctly:
- Water thoroughly until 20-30% of applied water drains from bottom holes
- This ensures entire root ball is saturated—no dry pockets
- Allow complete drainage—never let pot sit in standing water
- Empty saucer within 15 minutes of watering
Fix #3: Container Requirements
Your pot must have drainage holes. No exceptions, no alternatives, no “I’ll just water less.”
Drainage holes allow gravitational water evacuation. Without them, water accumulates at the bottom regardless of substrate type, creating an anaerobic zone where pathogens thrive.
Additional requirements:
- Pot size: Only 1-2 inches larger than root ball. Oversized pots hold excess wet substrate that roots can’t access, creating stagnant moisture pockets
- Material: Terracotta ideal (porous clay allows oxygen exchange). Plastic acceptable if drainage is excellent
- Never use cache pots without drainage: If using decorative cover pot, ensure it has drainage or use as outer sleeve only (remove inner pot to water, drain, then return)
Fix #4: Environmental Conditions
Root rot pathogens are opportunistic—they’re always present in the environment but only proliferate under specific conditions. Maintain these parameters to suppress pathogen activity:
- Temperature above 18°C (65°F): Below this, root growth stalls and plants become susceptible to infection. Optimal range: 21-27°C (70-80°F)
- Humidity 50-70%: Low humidity stresses plants and weakens disease resistance. Use humidifier if ambient humidity below 40%
- Air circulation: Stagnant air allows moisture buildup and fungal spore settling. Use small fan on low setting for gentle air movement (not direct blast on plant)
- Avoid cold drafts: Don’t place near AC vents, open windows in winter, or cold floor surfaces
Emergency FAQ: Common Questions During Root Rot Crisis
How long does it take for Monstera Thai Constellation to recover from root rot?
Full recovery takes 8-16 weeks depending on severity. You’ll see new root emergence within 2-4 weeks (water method) or 3-6 weeks (perlite/moss). New leaf production resumes at 8-12 weeks once root system is 50%+ regenerated. Continue rehabilitation protocols until the plant produces 2-3 new leaves consecutively.
Can I use rubbing alcohol instead of hydrogen peroxide?
No. Isopropyl alcohol (rubbing alcohol) is for sterilizing tools, not living plant tissue. At concentrations needed to kill pathogens (70%), alcohol causes severe tissue damage and cell death. Only hydrogen peroxide at 3% concentration diluted 1:2 with water is safe for root sterilization.
Should I cut off yellow leaves during recovery?
Wait until leaves are 80%+ yellow before removal. Partially yellow leaves are still photosynthesizing and supporting recovery. Premature removal eliminates energy production the plant needs for root regeneration. Once a leaf is mostly yellow with no green remaining, cut it off cleanly at the petiole base with sterilized scissors.
What if my Thai Constellation keeps getting root rot repeatedly?
Recurring root rot indicates you haven’t addressed the underlying cause. Most common issues: (1) Still using dense potting soil instead of chunky aroid mix, (2) Pot lacks drainage holes, (3) Watering before substrate dries sufficiently, (4) Oversized pot holding excess moisture, (5) Reusing contaminated old soil. Review the Prevention Protocol section and implement ALL fixes simultaneously—addressing just one factor isn’t sufficient.
Can I propagate cuttings from a plant with root rot?
Yes, if the stems/nodes above the rot zone are firm and healthy. Root rot is a root-level infection that doesn’t systemically travel through vascular tissue to stems (unlike bacterial wilt). Take cuttings 4+ inches above any brown/soft tissue, sterilize cutting tools between cuts, and root cuttings in clean water or perlite. This salvages the cultivar even if the mother plant dies. For emergency propagation protocols, see our guide on propagating Monstera from single nodes.
Is root rot contagious to other plants?
The pathogens (Pythium, Phytophthora) that cause root rot can spread via contaminated water, soil, or tools. To prevent transmission: (1) Quarantine infected plant during treatment, (2) Sterilize all tools with 70% alcohol after contact, (3) Don’t reuse water from infected plant, (4) Wash hands after handling, (5) Discard all old soil—never reuse. The pathogens don’t spread through air, so plants sitting near each other won’t infect via proximity alone.
Final Word: You Can Save Your Thai Constellation
If you’ve made it this far, your plant has a fighting chance.
Root rot feels like a death sentence, especially with an expensive rare plant like Thai Constellation. But the reality is that plants are remarkably resilient when given proper intervention.
The Urban Lab Protocol has a documented 70-85% success rate because it addresses root rot systematically: surgical removal of infection, chemical pathogen sterilization, and controlled rehabilitation in sterile medium. This isn’t hope—it’s evidence-based emergency medicine.
Act now. Every hour of delay reduces survival odds by approximately 2-3%.
You know what to do. Get to work.
The Urban Lab | Emergency Rescue Protocols Division
Monstera Thai Constellation Root Rot Treatment Protocol | Published: March 2026