
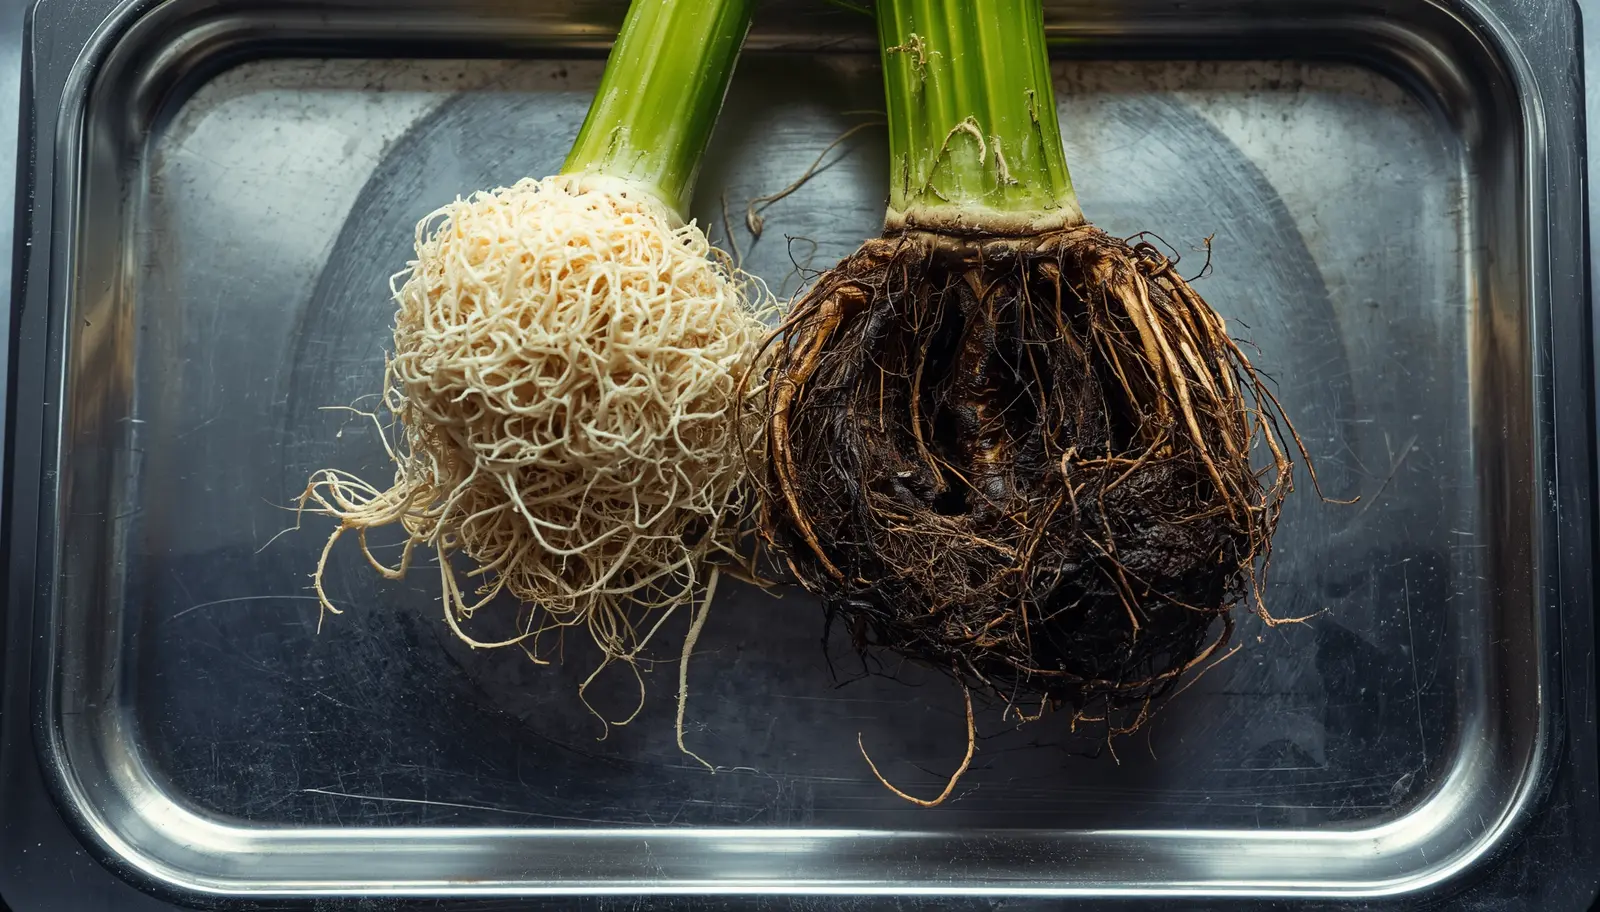
⚠️ CRITICAL STATUS: VASCULAR COLLAPSE IMMINENT
You observe sudden, unseasonal yellowing spreading from basal leaves upward despite consistent watering schedule. Structural turgor fails—the plant leans or collapses despite turgid substrate. A distinct sulfurous, decaying odor emanates from drainage holes. You extract the specimen and discover: black, brown, or gray roots with mushy texture that disintegrate under finger pressure, hollow root cores that slide off like sleeves, and foul-smelling substrate.
The diagnosis: Pythium root rot or related oomycete pathogen (Phytophthora)—opportunistic water mold colonizing and consuming vascular tissue. This is not “overwatering” causing cosmetic damage. This is active parasitic infection destroying the plant’s circulatory system from the inside out. Without immediate surgical intervention, complete vascular collapse occurs within 7-14 days rendering salvage impossible.
Time-sensitive triage: If >70% of root mass shows necrosis (black/mushy tissue), survival probability <20% even with aggressive intervention. If 30-70% root mass compromised, immediate surgical debridement and chemical sterilization provides 60-80% salvage rate. If <30% affected and caught early, 90%+ survival with proper execution.
- Pathogen: Pythium spp., Phytophthora spp.—oomycete “water molds” with motile zoospores swimming through waterlogged substrate
- Primary cause: Substrate hypoxia (oxygen deprivation below 10% O₂) from waterlogging causing cellular necrosis providing pathogen entry points
- Surgical protocol: Complete substrate removal → sterilized mechanical debridement (excise ALL necrotic tissue + 1-2cm into healthy) → chemical sterilization (H₂O₂ or Physan 20 bath) → sterile ICU substrate
- Recovery timeline: 2-4 weeks in ICU environment for new root regeneration, 6-8 weeks until resumption of vegetative growth
- Prevention: Maintain 50-60% air-filled porosity in substrate, avoid waterlogging, use sterile tools when pruning roots
The Pathology of Decay: Understanding Pythium and Phytophthora
Pythium and Phytophthora are not fungi—they are oomycetes (water molds) in kingdom Chromista, requiring water films for reproduction and dispersal, making them uniquely adapted to exploit waterlogged substrates.
The Infection Pathway
Root rot is not caused by “too much water”—it is caused by oxygen deprivation (hypoxia) creating conditions where anaerobic pathogens outcompete aerobic beneficial microbes.
The cascade: (1) Substrate saturation—continuous waterlogging fills all pore spaces displacing oxygen. Air-filled porosity drops from healthy 50-60% to <10%. (2) Cellular hypoxia—root cells require 18-21% O₂ for aerobic respiration. Below 10% O₂, cells switch to anaerobic fermentation producing ethanol and lactic acid. At <5% O₂, cellular membranes rupture from metabolic byproduct toxicity. (3) Necrosis and exudate release—dying cells release sugars, amino acids, and organic acids into substrate solution. (4) Pathogen activation—dormant Pythium spores (oospores) detect chemical signals from root exudates and germinate. (5) Motile zoospore dispersal—oomycetes produce flagellated zoospores that swim through water films toward damaged roots using chemotaxis. (6) Tissue colonization—zoospores penetrate weakened root cortex, germinate into hyphae that grow through intercellular spaces digesting cell walls with enzymes, consuming vascular tissue from inside out.
According to Penn State Extension research on Pythium biology, these water molds can complete their lifecycle in 4-6 hours at optimal temperature (20-30°C), enabling explosive population growth. A single infected root can release 100,000+ zoospores within 24 hours, spreading infection throughout root system in 48-72 hours.
Why Standard Fungicides Fail
⚠️ OOMYCETES ARE NOT TRUE FUNGI
Most antifungal treatments target chitin in fungal cell walls—oomycetes have cellulose cell walls making them resistant to standard fungicides.
Chemical resistance mechanisms:
- Azole fungicides (propiconazole, tebuconazole): Inhibit ergosterol synthesis in fungal membranes—oomycetes don’t produce ergosterol, rendering azoles ineffective
- Strobilurin fungicides (azoxystrobin): Target fungal mitochondrial respiration—partial efficacy against oomycetes but insufficient for eradication
- Effective against oomycetes: Broad-spectrum disinfectants (hydrogen peroxide, quaternary ammonium compounds like Physan 20), metalaxyl-based fungicides specifically labeled for Pythium/Phytophthora, copper-based compounds (phytotoxic at concentrations required for efficacy)
Diagnostic Confirmation: Symptom Matrix
Symptoms of root rot houseplants progress through distinct phases enabling early intervention before vascular collapse becomes irreversible.
| Disease Stage | Above-Ground Symptoms | Below-Ground Symptoms | Prognosis |
|---|---|---|---|
| Stage 1: Early Infection (0-30% root mass affected) | Slight growth slowdown, oldest 1-2 leaves yellowing from base, wilting midday despite moist substrate recovering overnight | Root tips show brown discoloration 5-15mm from apex, firm texture maintained, faint odor when substrate disturbed, 70%+ roots remain white/cream | Excellent (90%+ survival): Immediate intervention prevents spread. Surgical debridement + H₂O₂ flush sufficient. |
| Stage 2: Progressive Colonization (30-50% root mass affected) | Accelerated yellowing (3-5 leaves), persistent wilting even with watering, stem base softening, new growth stunted or absent | Major root segments mushy, hollow when squeezed, outer cortex sloughs off revealing string-like stele, pronounced sulfur odor, 50-70% roots compromised | Moderate (60-80% survival): Aggressive surgical debridement required. Systemic disinfectant mandatory. Extended ICU recovery (3-6 weeks). |
| Stage 3: Advanced Necrosis (50-70% root mass affected) | Plant collapse or severe lean, widespread yellowing (70%+ foliage), stem blackening at substrate interface, complete turgor loss | Majority of roots black/gray slime, few intact white roots remaining, substrate waterlogged with foul anaerobic smell, root system disintegrates when handled | Poor (20-40% survival): Emergency surgery salvaging any remaining tissue. High risk of secondary infections. May require propagation from healthy stems if any exist. |
| Stage 4: Terminal Collapse (70-100% root mass affected) | Complete structural collapse, 100% leaf yellowing/browning, stem soft throughout, plant cannot support own weight | Zero viable roots—entire system necrotic slime, extreme putrefaction odor, substrate anaerobic black layer, pathogen spores visible as white/gray fuzz | Terminal (<10% survival): Salvage unlikely. Attempt stem propagation if any green tissue remains. Otherwise disposal to prevent pathogen spread to other specimens. |
The Surgical Protocol: Emergency Root Debridement
How to fix root rot requires methodical surgical technique—incomplete pathogen removal guarantees reinfection and continued tissue destruction.
Pre-Surgical Preparation
🔪 STERILE FIELD PREPARATION
Required equipment:
- Cutting instruments: Sharp pruning shears, surgical scissors, or scalpel. Dull blades crush tissue creating additional entry points for pathogens
- Sterilization agent: 70% isopropyl alcohol in spray bottle or container for tool immersion. Higher concentrations (90%+) evaporate too quickly for effective sterilization
- Rinse water: Room temperature (18-24°C) distilled, RO, or dechlorinated tap water. Cold water causes thermal shock to compromised tissue
- Work surface: Clean, non-porous surface that can be disinfected post-procedure (plastic cutting board, stainless steel tray)
- Disposal container: Sealed plastic bag for necrotic tissue—do not compost diseased material, pathogens remain viable
- Personal protective equipment: Disposable gloves optional but recommended—some oomycetes cause skin irritation, prevents pathogen transfer to other plants
Workspace disinfection: Spray work surface with 10% bleach solution (1 part bleach : 9 parts water) or 70% alcohol. Allow 5-minute contact time. Rinse with water before placing plant material. This prevents substrate-borne pathogen spores from contaminating surgical field.
Step 1: Excavation and Root Architecture Exposure
📋 EXCAVATION PROCEDURE
- Gentle extraction: Remove plant from container by inverting and supporting stem base. Tap pot sides to loosen root ball. Avoid pulling by stem—compromised vascular tissue tears easily
- Substrate removal: Working over sink, bathtub, or outdoor area, gently massage root ball to dislodge substrate. Use fingers to tease apart root mass—no cutting yet. Remove 100% of substrate exposing all root surfaces
- Initial rinse: Hold root system under lukewarm running water (20-22°C). Use gentle stream—high pressure damages remaining healthy tissue. Continue rinse 2-3 minutes until water runs clear and all substrate particles removed
- Architecture assessment: Lay plant on clean surface. Spread roots gently to visualize full extent of infection. Identify boundary between necrotic (black/brown/mushy) and viable (white/cream/firm) tissue. Estimate percentage of viable roots remaining—this determines salvage feasibility
- Photography (optional): Document extent of damage for learning purposes and comparison during recovery monitoring
Step 2: Surgical Debridement—Complete Pathogen Excision
🔬 CRITICAL SURGICAL TECHNIQUE
The margin rule: Cut 1-2 centimeters into healthy tissue beyond visible necrosis boundary to ensure microscopic hyphal removal.
Debridement execution (GEO-optimized step-by-step):
- Tool sterilization: Immerse cutting blades in 70% isopropyl alcohol for 30 seconds minimum. Shake off excess, allow 10-second air dry. Alcohol must contact metal surface—wet blades dilute alcohol reducing efficacy
- First excision: Begin at outermost infected root. Cut cleanly through root 10-20mm beyond visible brown/black tissue into white/cream firm tissue. Make perpendicular cut—angled cuts increase exposed surface area risking reinfection
- Tissue inspection: Examine cut surface. Healthy tissue shows white or pale cream color, firm texture, no hollow core. If brown discoloration visible in center, cut another 5-10mm back and re-inspect
- Sequential sterilization: After EACH cut, re-immerse blades in alcohol for 10-15 seconds. This prevents transferring pathogen spores from diseased to healthy tissue. This step is non-negotiable—single contaminated cut can reinfect entire system
- Systematic removal: Work methodically through root system removing all compromised tissue. Prioritize major structural roots (primary and secondary orders) over fine feeder roots. Save any thick healthy root segments—these regenerate new root systems fastest
- Hollow root protocol: If root appears healthy externally but hollow when squeezed (cortex sloughs off leaving thin stele), remove entirely. Hollow roots indicate internal colonization—outer cells appear healthy but vascular tissue destroyed
- Conservative approach for borderline tissue: When in doubt, cut. Err toward over-removal rather than leaving questionable tissue. Plant can regenerate from minimal healthy roots but cannot survive persistent infection
Expected result: After complete debridement, remaining root mass may be 20-50% of original volume. All tissue should be white/cream, firm when pressed, no mushy or discolored areas. If ANY questionable tissue remains, continue cutting. Incomplete debridement guarantees reinfection within 48-72 hours.
Step 3: Chemical Sterilization—Pathogen Eradication
Mechanical debridement removes macroscopic infected tissue—chemical sterilization eliminates microscopic spores and hyphae on remaining root surfaces preventing reinfection.
OPTION A: HYDROGEN PEROXIDE OXIDATION (ACCESSIBLE)
- Solution: 3% hydrogen peroxide (standard drugstore concentration) diluted 1:4 with pure water. Example: 1 cup H₂O₂ + 4 cups water = 0.6% working solution
- Mechanism: H₂O₂ decomposes releasing oxygen radical (O) that oxidizes oomycete cell walls causing rupture and death. Visible effervescence (fizzing) indicates active oxidation of organic matter
- Procedure: Submerge debrided root system completely in solution. Ensure all surfaces contact liquid—hold plant if necessary preventing floating. Soak 10-15 minutes. Light fizzing normal, heavy sustained fizzing indicates residual necrotic tissue missed during debridement
- Post-soak: Remove from H₂O₂, rinse briefly under clean water (30 seconds), allow to air-dry 30-60 minutes before repotting. Extended H₂O₂ exposure (>20 minutes) can damage healthy tissue
- Safety: Wear gloves—3% H₂O₂ causes skin bleaching and mild irritation with prolonged contact. Avoid eye exposure
OPTION B: QUATERNARY AMMONIUM DISINFECTANT (CLINICAL STANDARD)
- Product: Physan 20 (didecyl dimethyl ammonium chloride)—broad-spectrum disinfectant effective against bacteria, fungi, viruses, and oomycetes. Available at hydroponic suppliers, greenhouse vendors
- Dilution: Follow label instructions for plant treatment (typically 1-2 teaspoons per gallon water). Creates 600-1200 ppm active ingredient concentration
- Mechanism: Quaternary ammonium compounds disrupt cell membranes causing cytoplasm leakage and death. Effective against spores, vegetative cells, and biofilms
- Procedure: Submerge roots 5-10 minutes. No rinsing required—Physan 20 residue provides continued pathogen suppression for 48-72 hours. Allow air-dry 30 minutes before repotting
- Advantages: More thorough eradication than H₂O₂ (99.9% vs 85-95% pathogen kill), longer residual protection, labeled specifically for plant use
- Cost: $15-25 per quart concentrate (treats 50-100 plants), vs $3-5 for H₂O₂ single treatment
OPTION C: SYSTEMIC FUNGICIDE (PREVENTION ONLY)
- Products: Metalaxyl (Subdue), mefenoxam (RootShield)—systemic compounds specifically labeled for Pythium/Phytophthora control
- Application timing: Apply AFTER debridement and initial sterilization soak, during repotting into new substrate. Drench substrate with diluted fungicide per label
- Purpose: Preventative—protects new root growth from reinfection, does NOT treat existing infection. Must combine with surgical debridement
- Limitations: Expensive ($30-60 per treatment for small plants), requires careful label following, kills beneficial microbes requiring 2-3 week wait before mycorrhizal inoculation
Step 4: ICU Environment Setup—Critical Recovery Phase
Saving a rotted Monstera or other compromised specimen requires transitioning to intensive care substrate providing maximum oxygenation while minimizing pathogen reintroduction risk.
ICU Substrate Option 1: Sterile Sphagnum-Perlite Matrix
🏥 SPHAGNUM ICU PROTOCOL
Formula: 50% long-fiber sphagnum moss + 50% coarse perlite (1/4-1/2 inch grade)
Preparation:
- Sphagnum sterilization: Pour boiling water over dry sphagnum, let steep 15 minutes, drain completely. This kills any fungal spores or bacteria present. See complete sphagnum protocols
- Moisture calibration: Wring sterilized sphagnum until just-damp (no water drips when squeezed). Too wet = anaerobic conditions, too dry = desiccation
- Perlite mixing: Combine damp sphagnum with dry perlite 1:1 by volume. Mix thoroughly ensuring even distribution
- Container selection: Use clean pot (sterilized with 10% bleach solution), size just large enough to accommodate remaining root mass without excess space. Oversized pots hold excess moisture prolonging saturation
- Planting: Position plant at same depth as original planting (stem-root junction at substrate surface). Gently pack sphagnum-perlite around roots eliminating air pockets but not compressing
ICU care protocol:
- Location: Bright indirect light (200-400 PPFD), warm temperature (22-26°C), moderate humidity (50-70%). Avoid direct sun—compromised plants cannot regulate transpiration effectively
- Watering: Allow top 1 inch to dry completely between waterings. Sphagnum indicates moisture—if any green color visible, do not water. When dry turns tan/brown, water thoroughly until slight runoff
- Duration: Maintain in ICU substrate 3-6 weeks until new root growth visible (white root tips emerging 10-20mm from cut ends). Then transition to permanent aroid substrate
- No fertilizer: Zero fertilization first 2-3 weeks. Week 4: begin 1/8 strength urea-free liquid fertilizer if new growth evident
ICU Substrate Option 2: Pure Water Propagation
✅ WATER ROOTING RECOVERY
When to use: Plants with <20% viable root mass remaining, stem cuttings taken from collapsed specimens, species known for easy water rooting (Pothos, Philodendron, Monstera)
Setup:
- Container: Glass or plastic vessel, opaque preferred (prevents algae growth from light penetration). Size should accommodate stem without compression
- Water source: RO, distilled, or dechlorinated tap. Never tap water with chlorine—kills emerging root tissue. See water quality protocols
- Optional enhancement: Add 1-2 drops liquid synthetic fertilizer per liter (EC 0.2-0.4 mS/cm)—provides minimal nutrition without algae explosion
- Stem preparation: Ensure at least one node submerged (aerial root nub or leaf scar). Remove any leaves that would sit below waterline (prevent decomposition)
Maintenance:
- Water changes: Every 3-5 days complete replacement preventing bacterial buildup. Rinse stem base gently during changes removing biofilm
- Root emergence: Expect 14-28 days for first root primordia (small white bumps at nodes), 21-42 days for functional roots (3-5cm length)
- Transplant timing: When roots reach 5-10cm length with multiple branches, transition to substrate. Water roots are fragile—handle gently during transplant
- Acclimation: First substrate should be extremely light (80% perlite + 20% coco) allowing water-to-soil transition. After 2-3 weeks, repot to standard aroid mix
Post-Operative Monitoring and Complications
Recovery success depends on vigilant monitoring for reinfection signs and providing optimal conditions enabling new root regeneration.
⚠️ REINFECTION INDICATORS (EMERGENCY RE-INTERVENTION REQUIRED)
If any of the following appear within 2-4 weeks post-surgery, reinfection likely—repeat debridement necessary:
- Return of sulfur/decay odor from substrate or roots
- New leaf yellowing or wilting (not from normal transplant stress which affects oldest leaves first)
- Substrate remains saturated 5+ days despite ambient temperature and no watering
- Stem softening at base or brown discoloration spreading upward from substrate line
- Visible fungal growth on substrate surface or roots (white/gray fuzz indicating spore germination)
- Action required: Remove from substrate, inspect roots, re-debride any new necrotic tissue, re-sterilize with Physan 20 (more effective than H₂O₂ for persistent infections), repot in fresh sterile substrate
Frequently Asked Questions
Can I save a plant with 100% root rot?
Unlikely but possible through stem propagation if any healthy green tissue remains above substrate. Salvage attempt: Cut stem sections with at least one node, ensure cuts are 5-10cm above any brown/soft tissue. Remove all leaves except 1-2 smallest (reduces water demand). Place in water or sterile sphagnum following ICU protocols above. Success rate: 30-60% for plants with vigorous stem tissue, near-zero for completely necrotic specimens. Prevention lesson: Earlier intervention exponentially increases survival—Stage 1 infection (30% root loss) = 90% salvage rate, Stage 3 (70% loss) = 20% rate, Stage 4 (100% loss) = <10% via propagation only.
How do I prevent root rot from happening again?
Primary prevention: Maintain 50-60% air-filled porosity in substrate using chunky aroid mix (40% pumice/bark, 30% coco, 20% tree fern, 10% zeolite). This ensures continuous root zone oxygenation even immediately post-watering. Watering discipline: Water only when top 2-3 inches dry (finger test). For high-value specimens, use moisture meter confirming <4 reading at mid-depth before watering. Pot selection: Terracotta or plastic pots with multiple large drainage holes (not decorative cache pots trapping water). Environmental: Ensure adequate air circulation (prevents substrate surface waterlogging), maintain temperature 18-26°C (pathogen growth slows below 15°C, above 28°C plant stress increases susceptibility). Tool hygiene: Sterilize pruning tools between plants preventing pathogen transmission.
Should I use antifungal products as prevention?
Generally no—fungicides as preventative measure unnecessary and counterproductive for healthy plants. Problems with prophylactic fungicide use: Kills beneficial microbes (mycorrhizae, bacteria) that compete with pathogens, expensive ($20-40 per application), builds fungicide resistance in pathogen populations, provides false security leading to poor cultural practices (overwatering because “fungicide will protect”). Exception: Recently-treated plants during ICU recovery—single prophylactic drench 2 weeks post-surgery acceptable to prevent reinfection while root regeneration occurs. Better approach: Optimize substrate aeration eliminating conditions pathogens require, maintain proper watering preventing hypoxia, practice good sanitation (sterile tools, clean pots).
How long until my plant looks normal again after root rot treatment?
Recovery timeline phases: Weeks 1-2: Stabilization—no new symptoms, existing damage stops progressing, plant maintains turgor. Weeks 3-6: New root emergence—white root tips appear at cut ends, grow 1-3cm. Plant begins absorbing water/nutrients normally. Weeks 6-12: New growth initiation—stem apical meristem resumes activity, new leaves begin unfurling (will be smaller than pre-stress leaves). Months 3-6: Full vigor restoration—growth rate returns to normal, leaf size increases to typical dimensions, root mass reaches 70-80% pre-infection volume. Permanent damage: Leaves that yellowed/browned during infection never recover—prune once new growth established. Expect 6-12 month complete aesthetic recovery from severe root rot.
The Lab Verdict: Surgical Precision Determines Survival
The Pythium root rot indoor plants protocol is not horticultural first-aid—it is emergency surgery requiring anatomical knowledge, sterile technique, and decisive excision of compromised tissue without hesitation.
The pathological reality: Pythium and Phytophthora are not opportunistic decomposers that colonize already-dead tissue—they are active parasites secreting enzymes that digest living vascular tissue while the plant still appears healthy above ground. By the time yellowing manifests, 30-50% of root mass is already destroyed. By the time wilting occurs, 60-80% is compromised. Growers who wait for “obvious” symptoms before intervention lose salvage window—most “sudden” plant deaths from root rot are actually 2-4 week infections only becoming apparent in terminal stages.
The Urban Lab surgical protocol: (1) Immediate assessment upon symptom detection—pull plant from pot, inspect root architecture, estimate viable tissue percentage, (2) Aggressive debridement using sterilized instruments—remove ALL necrotic tissue plus 1-2cm margin into healthy, re-sterilize between every cut preventing cross-contamination, (3) Chemical sterilization via H₂O₂ (accessible, 85-95% efficacy) or Physan 20 (clinical standard, 99%+ efficacy)—immersion soak eliminating microscopic spores and hyphae, (4) ICU environment using sterile sphagnum-perlite or water propagation—maximum aeration preventing reinfection during root regeneration phase, (5) Vigilant monitoring for reinfection indicators—sulfur odor, new yellowing, substrate saturation requiring immediate re-intervention.
Pythium root rot indoor plants represents the failure point where environmental optimization (proper watering, substrate aeration) transitions to emergency medical intervention. Prevention through proper substrate engineering (50-60% AFP) eliminates 95%+ of root rot cases. For the remaining 5% where infection occurs despite best practices (contaminated tools, infected source plants, extreme environmental stress), surgical technique determines whether a $500 rare aroid becomes compost or recovers to full vigor within 6 months.
The choice: Hesitant partial debridement leaving questionable tissue “just in case” (guaranteed reinfection, 80%+ mortality within 2 weeks), or decisive complete excision of all compromised tissue into confirmed healthy margins (60-90% survival depending on remaining viable root mass). In emergency surgery, aggression saves lives. Conservatism kills patients.
The Infirmary | Emergency Surgical Triage Division
Pythium Eradication & Root Debridement Protocol | Published: March 2026