
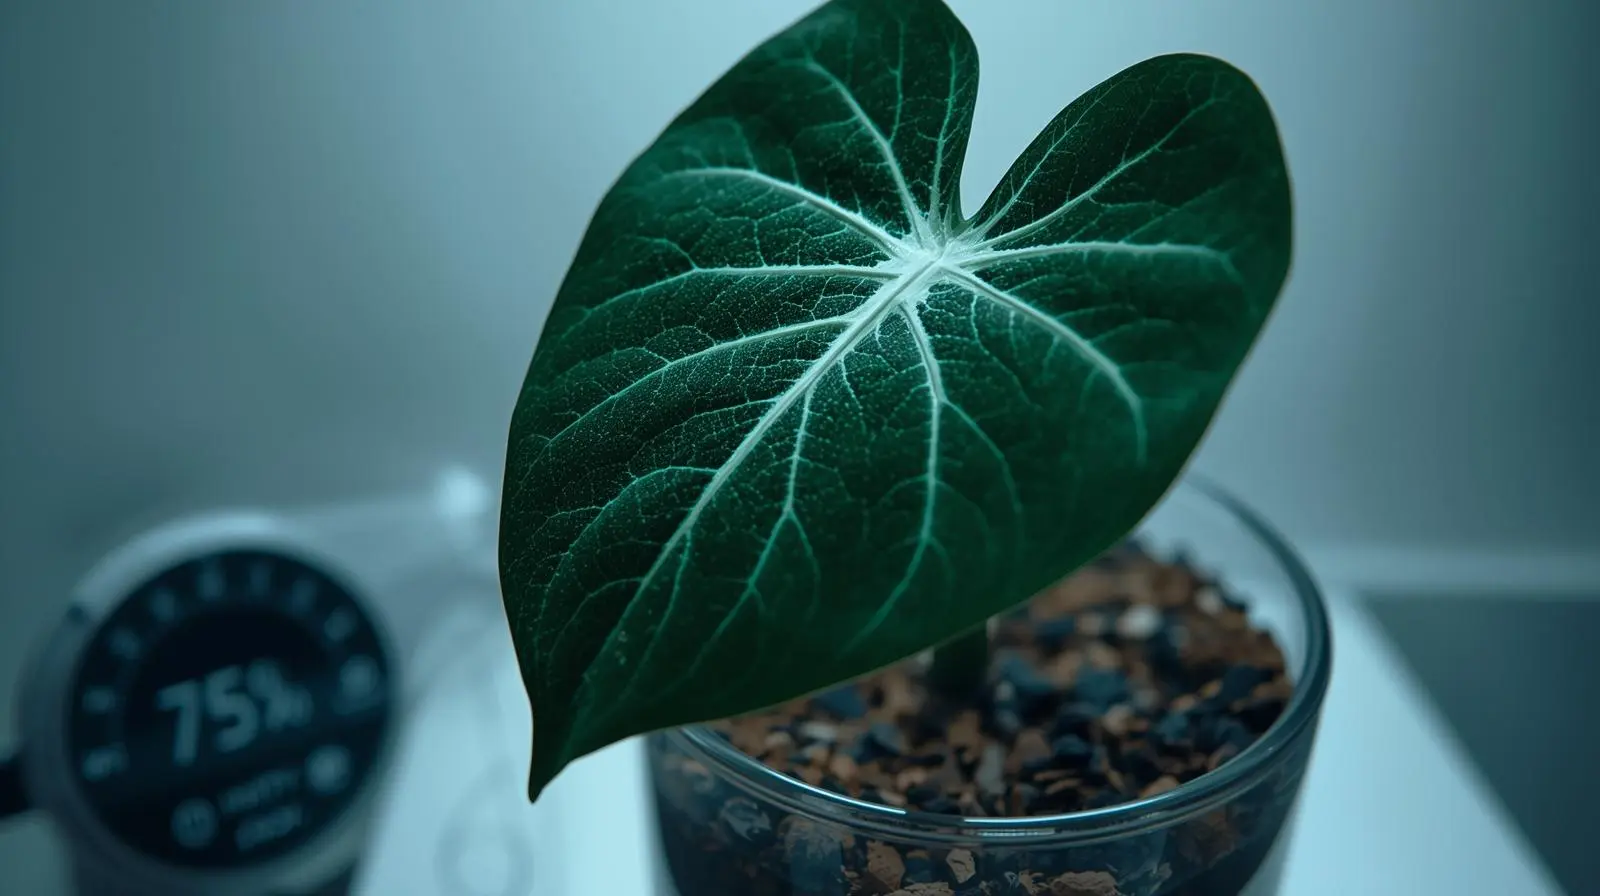
The Velvet Collector’s Paradox: Anthurium clarinervium ranks among the most visually striking aroids in cultivation—its deep green, heart-shaped leaves are embellished with prominent white venation that resembles hand-painted porcelain. Yet this Mexican endemic maintains a mortality rate exceeding 60% in typical household environments.
The Failure Pattern: Most casualties result from a fundamental misunderstanding of the plant’s epiphytic/lithophytic root physiology. Cultivators treat A. clarinervium like a terrestrial houseplant, placing it in standard potting soil with moderate humidity. Within 6-8 weeks, characteristic symptoms emerge: crispy brown leaf margins, yellowing older leaves, and eventual root rot from anaerobic soil conditions.
The Urban Lab Solution: Anthurium clarinervium is not difficult—it’s specific. This protocol provides the exact substrate formulation, humidity parameters (Vapor Pressure Deficit), and diagnostic framework required to maintain pristine velvet foliage indefinitely. We treat this species as the rare epiphyte it is, not the common houseplant it is not.
📋 Table of Contents
- Environmental Specifications
- The Botany of Anthurium clarinervium
- The Epiphytic Root Substrate Recipe
- Vapor Pressure Deficit & Humidity Protocol
- Watering Protocol for Epiphytic Substrate
- Lighting Requirements
- Diagnostic Troubleshooting
- Propagation Methods
- Pest and Disease Management
- Frequently Asked Questions
Environmental Specifications: Anthurium clarinervium
| Environmental Metric | The Urban Lab Standard |
|---|---|
| Native Habitat | Limestone outcrops of Chiapas, Mexico (Lithophytic/Epiphytic growth habit) |
| Light Requirement | Bright indirect light (10,000-20,000 lux) | Avoid direct sun exposure |
| Humidity Baseline | 60% minimum (70-80%+ optimal for pristine velvet texture) |
| Temperature Range | 18-27°C (65-80°F) | Avoid below 15°C (59°F) |
| Substrate Type | Ultra-chunky, high-aeration aroid mix | NEVER standard potting soil |
| Watering Protocol | When top 2 inches of substrate are dry | Use distilled or RO water only |
| Fertilization | Diluted liquid fertilizer (¼ strength) every 4-6 weeks during growth |
The Botany of Anthurium clarinervium: Understanding the Velvet Aroid
Anthurium clarinervium represents a distinct evolutionary lineage within the Araceae family (the same family as Monstera, Pothos, and Philodendron). Unlike the ubiquitous Anthurium andraeanum (the red “Flamingo Flower” sold in supermarkets for its showy spathes), A. clarinervium is cultivated exclusively for its ornamental foliage—specifically, its velvety leaf texture and striking white venation pattern.
Native Habitat and Growth Habit
Endemic to the cloud forests of Chiapas, Mexico, A. clarinervium occupies a specialized ecological niche: limestone rock faces and tree bark in montane regions at elevations of 900-1,200 meters. According to Missouri Botanical Garden’s plant database, this habitat creates two critical growth adaptations:
- Epiphytic root structure: Roots anchor to vertical surfaces (trees, rocks) and are continuously exposed to moving air, not waterlogged soil
- Lithophytic tolerance: Can grow directly on limestone, absorbing nutrients from rainwater runoff and organic debris in rock crevices
- Cloud forest humidity: Experiences 70-90% relative humidity with frequent mist and fog, maintaining constant leaf moisture
- Filtered canopy light: Grows under tree canopy with dappled sunlight—never full sun exposure
These adaptations explain why Anthurium clarinervium fails catastrophically in dense, moisture-retentive potting soil. The roots evolved for high oxygen availability and rapid drainage—conditions incompatible with standard terrestrial substrates used for typical houseplants.
Leaf Morphology and Function
The distinctive white venation isn’t merely decorative—it represents vascular bundles that transport water and nutrients throughout the leaf tissue. The velvety texture results from specialized epidermal cells with micro-papillae that scatter light, creating the characteristic matte appearance that distinguishes A. clarinervium from other Anthurium species.
However, this velvet surface has a critical vulnerability: high transpiration rate. The porous leaf texture allows rapid water loss in low-humidity environments, causing the characteristic crispy brown edges that plague indoor cultivation. This is why humidity management is absolutely critical for successful Anthurium clarinervium care.
| Family | Araceae (Aroid family) |
| Genus | Anthurium |
| Species | clarinervium |
| Common Names | Velvet Cardboard Anthurium |
| Growth Habit | Epiphytic/Lithophytic perennial |
| Mature Size | Leaves 15-30 cm wide; plant height 30-60 cm |
Critical Note: The epiphytic root system requires constant oxygen availability. Standard terrestrial soil suffocates these roots, causing rapid decline regardless of watering frequency.
The “Epiphytic Root” Substrate Recipe: Preventing Root Rot
The single most common cause of Anthurium clarinervium mortality is root rot from inappropriate substrate. This species cannot tolerate dense, moisture-retentive potting mixes. Its thick, fleshy roots require massive air circulation and rapid drainage—conditions found on tree bark and rock faces, not in peat moss. This is similar to requirements for other epiphytic aroids like Philodendron gloriosum.
Why Standard Potting Soil Kills Anthurium clarinervium
Commercial potting soil typically contains 60-80% peat moss or coco coir—materials that retain water and collapse over time, reducing pore space. When A. clarinervium roots are placed in this environment:
- Oxygen deprivation: Waterlogged soil displaces air from pore spaces. Roots require aerobic respiration—without oxygen, cellular metabolism fails
- Anaerobic pathogen proliferation: Low-oxygen conditions favor Pythium, Phytophthora, and Fusarium fungi that colonize dying roots
- Root necrosis: Dead roots turn brown/black, become mushy, and emit foul odor
- Systemic collapse: Unable to absorb water or nutrients, leaves yellow and plant dies within 4-8 weeks
This failure is predictable and preventable with proper substrate formulation. For more information on root rot prevention, see our comprehensive guide on identifying and treating root rot in houseplants.
The Urban Lab Chunky Aroid Substrate Formula
This Anthurium clarinervium soil mix replicates the high-aeration, fast-draining conditions of the plant’s native epiphytic/lithophytic habitat:
| Component | Ratio | Function |
| Orchid Bark (Medium Grade) | 40% | Structure, drainage |
| Perlite or Pumice | 30% | Aeration, porosity |
| Horticultural Charcoal | 20% | pH buffer, odor control |
| Coco Coir or Worm Castings | 10% | Moisture retention, nutrients |
Component Specifications:
Orchid Bark: Use medium-grade bark chips (½-¾ inch pieces). Avoid fine bark dust—it compacts and reduces aeration. Bark provides structural stability while maintaining large air pockets. For more information, see our detailed guide on choosing the right drainage amendments.
Perlite/Pumice: Both are volcanic minerals that don’t decompose and maintain permanent porosity. Pumice is superior (heavier, more stable) but perlite is more readily available. Use coarse grade, not fine powder.
Horticultural Charcoal: Activated charcoal absorbs dissolved organic compounds, prevents anaerobic odors, and buffers pH. Use chunks 1/4-1/2 inch in size.
Coco Coir/Worm Castings: Minimal organic component provides slight moisture retention and slow-release nutrients without creating waterlogged conditions. Worm castings superior for nutrient content. Learn more about creating your own worm castings.
Why This Formula Works
When water is applied to this substrate, approximately 80% drains immediately through gravitational force. The remaining 20% is held in micro-capillaries on particle surfaces and in the small amount of coco coir/castings. According to Penn State Extension research on growing media, this creates:
- High oxygen availability: Large pore spaces (40-60% of total volume) remain air-filled
- Root contact with air: Roots grow through chunky mix with direct oxygen exposure, mimicking epiphytic conditions
- No compaction: Inorganic components (bark, perlite, charcoal) don’t decompose or collapse
- Rapid drainage: Excess water flushes through in seconds, preventing waterlogging
✅ Container and Potting Protocol
Container Selection:
- Use pots with multiple large drainage holes (minimum 3-4 holes, ½ inch diameter)
- Terracotta pots ideal—porous clay allows additional oxygen exchange through pot walls
- Clear orchid pots allow root health monitoring
- Size: Only 1-2 inches larger than root ball—excess substrate stays wet too long
Potting Technique:
- Add 1-inch layer of charcoal chunks at pot bottom for drainage
- Position plant at same depth as previous pot—never bury stem
- Fill around roots with chunky mix, gently tapping to settle (don’t compact)
- Top dress with orchid bark to prevent substrate desiccation
- Water thoroughly, allowing complete drainage
Repotting Frequency: Every 18-24 months or when roots visibly protrude from drainage holes. Anthurium clarinervium prefers being slightly root-bound—overpotting increases substrate volume that stays wet, promoting rot.
The Vapor Pressure Deficit (VPD) & Humidity Protocol
The #1 symptom reported by Anthurium clarinervium cultivators is crispy brown leaf edges. This isn’t a disease—it’s a physiological response to Vapor Pressure Deficit (VPD) imbalance. Understanding VPD is essential for preventing this common issue in velvet leaf Anthurium humidity management.
Understanding VPD and Transpiration Stress
Vapor Pressure Deficit measures the difference between the amount of moisture in the air and the maximum amount the air can hold at a given temperature. High VPD (hot, dry air) creates a steep humidity gradient between the saturated interior of the leaf and the dry surrounding air.
This gradient drives transpiration—water evaporation from leaf surfaces through stomata (pores). Under normal conditions, roots absorb water to replace what’s lost. However, when VPD is too high:
- Excessive transpiration: Water evaporates from leaves faster than roots can absorb and transport it
- Cellular dehydration: Leaf edge cells (furthest from vascular tissue) dry out first
- Cell death and necrosis: Dehydrated cells die, turning brown and crispy
- Progressive damage: Necrosis spreads inward from leaf margins if conditions don’t improve
Anthurium clarinervium’s velvet leaf texture exacerbates this problem. The porous, papillate surface has higher transpiration rates than glossy-leaved plants like Pothos or Rubber Plants, making it extremely sensitive to low humidity.
The Humidity Threshold
Based on cultivation data from botanical institutions and specialist growers:
- Below 50% RH: Crispy leaf edges appear within 2-3 weeks; velvet texture degrades
- 50-60% RH: Marginal acceptable range—edges may show minor browning
- 60-70% RH: Optimal range for healthy growth without edge damage
- 70-80% RH: Ideal range—pristine velvet texture, maximum leaf size, vibrant white venation
- Above 85% RH: Risk of fungal/bacterial issues without adequate airflow
Most homes maintain 30-50% relative humidity—well below A. clarinervium’s tolerance threshold. Humidity modification is mandatory for successful cultivation.
💧 Urban Lab Humidity Management Solutions
Option 1: Localized Humidifier (Most Practical)
- Place ultrasonic humidifier within 3 feet of plant
- Target output: sufficient to maintain 60-70% RH in immediate area
- Use distilled water only to prevent mineral deposits on leaves
- Run continuously during daylight hours; reduce at night to prevent fungal issues
- Pair with small fan for air circulation (prevents stagnant moisture)
Option 2: Greenhouse Cabinet (Maximum Control)
- Enclosed glass cabinet (IKEA DETOLF, vintage display cases)
- Maintains 70-80% RH naturally with minimal intervention
- Add LED grow lights if ambient light insufficient
- Install small USB fan for air circulation (prevents mold)
- Ideal for serious collectors with multiple rare aroids
Option 3: Plant Clustering (Moderate Improvement)
- Group multiple tropical plants together—their collective transpiration raises local humidity
- Increases RH by 5-15% in immediate vicinity
- Not sufficient alone for A. clarinervium but helps supplement humidifier
- Ensure adequate spacing to maintain airflow between plants
What NOT to Do: Misting
Foliar misting is ineffective and harmful. Water droplets on velvet leaves:
- Evaporate within minutes, providing no sustained humidity increase
- Leave mineral deposits that mar velvet texture
- Create conditions for bacterial leaf spot (Xanthomonas) and fungal infections
- Water trapped in leaf crevices promotes rot at petiole attachment points
Monitoring Humidity
Invest in a digital hygrometer to track relative humidity accurately. Place it at plant canopy level (not floor level where readings are inaccurate). Adjust humidifier output to maintain consistent 60-70% RH throughout the day. For more information on creating optimal growing environments, see our guide on building a humidity-controlled plant cabinet.
Watering Protocol for Epiphytic Substrate
The chunky aroid substrate requires a different watering approach than standard potting soil. Because it drains so rapidly, the concept of “overwatering” shifts from frequency to ensuring complete root ball saturation.
The Watering Technique
When to Water: Insert finger 2 inches into substrate. Water when this depth feels dry but substrate at pot bottom (check through drainage holes) still shows slight moisture. Typically every 7-10 days depending on temperature, humidity, and light intensity.
How to Water:
- Bring plant to sink or use saucer to catch drainage
- Water thoroughly until 20-30% of applied water drains from bottom
- This ensures complete root ball saturation—chunky mix sheds water, so multiple passes may be needed
- Allow complete drainage—never let pot sit in standing water
- Return to growing location
⚠️ Water Quality Critical for Anthurium clarinervium
Tap Water Toxicity: Municipal tap water contains dissolved minerals (calcium, magnesium carbonates), chlorine, and fluoride. When applied repeatedly, these accumulate in substrate and leaf tissue, causing:
- Leaf edge necrosis: Brown, crispy margins from salt accumulation
- Substrate salt crust: White mineral deposits on orchid bark surface
- pH drift: Minerals raise substrate pH, reducing nutrient availability
- Root tip burn: High salt concentration damages delicate root meristems
Solution: Use distilled water, reverse osmosis (RO) water, or collected rainwater exclusively. If tap water necessary, flush substrate monthly with 3x pot volume of distilled water to leach accumulated salts. Learn more about collecting and storing rainwater for plants.
Fertilization Protocol
Epiphytic aroids are adapted to low-nutrient environments—they extract minerals from dilute rainwater runoff and decomposing organic debris. Heavy fertilization causes salt buildup and root burn.
Urban Lab Fertilization Schedule:
- Fertilizer Type: Balanced liquid formulation (20-20-20 NPK) or orchid-specific fertilizer
- Dilution: ¼ strength (25% of package recommendation)
- Frequency: Every 4-6 weeks during active growth (spring/summer); every 8-12 weeks during dormancy (fall/winter)
- Application: Apply to moist substrate only—never fertilize dry substrate or dormant plants
- Flush Protocol: Every 3-4 months, flush substrate with plain distilled water to prevent salt accumulation
Lighting Requirements for Anthurium clarinervium
As an understory epiphyte, A. clarinervium evolved under dappled canopy light—bright but filtered, never direct sun. Replicating this indoors prevents photodamage while providing sufficient energy for photosynthesis.
The Light Spectrum
- Optimal Intensity: 10,000-20,000 lux (1,000-2,000 foot-candles)
- Direct Sun Exposure: NEVER—causes immediate photo-bleaching, brown scorch marks, and permanent leaf damage
- Window Placement: East-facing window (gentle morning sun) or north-facing (bright indirect all day)
- Distance from Window: Within 3-6 feet for adequate brightness
- Supplemental Lighting: LED grow lights if natural light insufficient—position 12-18 inches above canopy
For comprehensive information on lighting requirements for tropical plants, see our guide on choosing and positioning LED grow lights.
✅ The Shadow Test
Hold your hand 12 inches above the plant during peak daylight hours. You should see a soft, diffuse shadow—not sharp and dark (too much direct sun) or barely visible (insufficient light). This indicates optimal bright indirect light levels for proper Anthurium clarinervium care.
Diagnostic Troubleshooting: Common Anthurium clarinervium Problems
Accurate symptom diagnosis prevents cascading failures and enables targeted intervention.
Why Are the Edges of My Anthurium Leaves Crispy?
Crispy edges on Anthurium leaves (marginal necrosis) have three primary causes in A. clarinervium:
1. Low Humidity (Most Common – 75% of cases)
- Pattern: Brown, dry edges starting at leaf tips and progressing inward; affects newest leaves first
- Mechanism: High VPD causes transpiration to exceed water uptake; edge cells dehydrate and die
- Solution: Increase relative humidity to 60-70% using humidifier; ensure adequate watering
- Prevention: Maintain consistent humidity; never allow RH below 55% for extended periods
2. Mineral Accumulation from Tap Water (20% of cases)
- Pattern: Brown edges with white crystalline deposits; older leaves affected first
- Mechanism: Dissolved salts from tap water accumulate in leaf margins as water transpires
- Solution: Switch to distilled or RO water immediately; flush substrate with 3x pot volume of distilled water
- Prevention: Use only mineral-free water sources; flush substrate every 3-4 months
3. Root Damage/Insufficient Water Uptake (5% of cases)
- Pattern: Crispy edges combined with general wilting despite adequate watering
- Mechanism: Damaged roots cannot absorb sufficient water to replace transpiration losses
- Solution: Unpot and inspect roots; remove any brown/mushy tissue; repot in fresh chunky substrate
- Prevention: Use appropriate substrate; never allow waterlogging or complete desiccation
Why Are the Leaves Turning Yellow?
Chlorosis (yellowing) in Anthurium clarinervium indicates either root dysfunction or nutrient deficiency.
1. Root Rot from Overwatering (60% of cases)
- Pattern: Yellowing starts with oldest leaves; progression accelerates; leaves feel thin/papery; musty odor from substrate
- Mechanism: Waterlogged substrate (usually from too-dense mix) deprives roots of oxygen; roots die and rot; plant cannot absorb water/nutrients
- Diagnosis: Gently unpot—roots are brown/black, mushy, and separate easily from central core when pulled
- Treatment: Remove all dead root tissue with sterilized scissors; repot in fresh, chunky aroid mix; reduce watering frequency; increase air circulation
- Prevention: Use proper substrate formula (40% orchid bark, 30% perlite, 20% charcoal, 10% coco coir); ensure excellent drainage
For detailed root rot treatment protocols, see our comprehensive guide on saving plants from root rot.
2. Nitrogen Deficiency (30% of cases)
- Pattern: Older leaves yellow uniformly while new growth remains green; no root damage or odor
- Mechanism: Nitrogen is mobile in plants—when deficient, plant cannibalizes N from old leaves to supply new growth
- Treatment: Apply diluted balanced fertilizer (20-20-20 at ¼ strength); repeat every 3-4 weeks until color improves
- Prevention: Maintain regular fertilization schedule (every 4-6 weeks during growth); don’t skip feeding
3. Natural Senescence (10% of cases)
- Pattern: One older leaf yellows and drops every few months while plant produces new growth
- Mechanism: Normal lifecycle—oldest leaves eventually senesce as plant redirects energy to new growth
- Action: None required—this is healthy plant behavior; remove yellow leaf once completely dead
What Is the Green Spike Growing Out of My Plant?
This is an inflorescence—the flowering structure characteristic of all Anthurium species. In A. clarinervium, it consists of two parts:
- Spadix: The narrow, cylindrical spike (typically pale green) covered with tiny individual flowers
- Spathe: The modified leaf (bract) partially surrounding the spadix base—in A. clarinervium, this is green and inconspicuous (unlike the showy red spathe of A. andraeanum)
Flowering and Energy Allocation: Producing flowers and seeds requires significant metabolic energy. In foliage-focused species like A. clarinervium, flowering temporarily reduces leaf production size and quality as the plant diverts resources to reproduction.
🌸 Inflorescence Management Decision
Option 1: Remove the Inflorescence (Recommended for Maximum Foliage)
- Use sterilized scissors or pruning shears
- Cut the peduncle (flower stem) at its base where it emerges from the main plant
- This redirects energy back to leaf production within 2-3 weeks
- Results in larger, more numerous leaves over the growing season
Option 2: Allow Flowering (If Interested in Seeds/Pollination)
- Flowers are not ornamentally significant—green, small, lacking fragrance
- Self-pollination rare; requires manual pollination or second plant for seed production
- If pollinated, seeds develop over 6-9 months in small berries on spadix
- Leaf production slows during this period
- Remove inflorescence after seed harvest or when it begins yellowing/dying
Propagation: Expanding Your Collection
Anthurium clarinervium propagates through vegetative division—the plant naturally produces offsets (pups) from the base as it matures.
Division Protocol
Timing: Spring, when plant enters active growth phase and can recover quickly
Procedure:
- Gently unpot mature plant (minimum 2-3 years old with multiple growth points)
- Brush away substrate to expose root structure and connections between offsets
- Identify natural separation points—offsets with their own root systems
- Using sterilized knife or shears, cut through connecting rhizome between parent and offset
- Ensure each division has minimum 3-4 leaves and healthy root system
- Pot separately in chunky aroid substrate
- Place in high-humidity environment (70-80% RH) for 4-6 weeks to reduce transplant shock
- Reduce watering slightly until new growth indicates establishment
Success Rate: 80-90% if divisions have adequate roots and humidity is maintained during recovery period. For more propagation techniques, see our guide on propagating rare aroids.
Pest and Disease Management
Anthurium clarinervium is relatively pest-resistant but susceptible to common greenhouse arthropods.
Spider Mites (Tetranychus urticae)
- Conditions: Thrive in low humidity (<50% RH) and stagnant air
- Symptoms: Fine stippling on leaves, silvery webbing on undersides, eventual yellowing
- Treatment: Increase humidity to 70%+ (mites hate moisture); spray with insecticidal soap or neem oil every 5-7 days for 3 weeks. See our comprehensive neem oil application guide for detailed protocols.
- Prevention: Maintain adequate humidity and air circulation
Thrips (Frankliniella spp.)
- Symptoms: Silvery streaking on leaves, black fecal spots, distorted new growth
- Treatment: Systemic insecticide (imidacloprid) or predatory mites (Neoseiulus cucumeris)
- Prevention: Quarantine new plants for 2-3 weeks before introducing to collection
Bacterial Leaf Spot (Xanthomonas spp.)
- Symptoms: Water-soaked lesions that turn brown, often with yellow halos; spreads rapidly in high humidity without airflow
- Treatment: Remove affected leaves immediately; reduce humidity to 60-65%; ensure air circulation; apply copper-based bactericide as described by University of Minnesota Extension
- Prevention: Never mist leaves; ensure adequate air movement in humid environments
Frequently Asked Questions: Anthurium clarinervium Care
What is the best soil for Anthurium clarinervium?
The best Anthurium clarinervium soil mix is a chunky epiphytic substrate consisting of 40% orchid bark (medium grade), 30% perlite or pumice, 20% horticultural charcoal, and 10% coco coir or worm castings. Never use standard potting soil as it retains too much moisture and causes root rot.
How do I prevent crispy edges on Anthurium clarinervium?
Maintain 60-70% relative humidity using a localized humidifier, use only distilled or RO water (never tap water), and ensure adequate but not excessive watering. Low humidity and mineral accumulation from tap water are the primary causes of crispy brown leaf edges.
Can Anthurium clarinervium tolerate low humidity?
No. Anthurium clarinervium requires minimum 60% RH. Below this threshold, the velvet leaves develop crispy brown edges within 2-3 weeks due to excessive transpiration. Standard household humidity (30-50%) is insufficient without modification.
How often should I water Anthurium clarinervium?
Water when the top 2 inches of substrate feel dry, typically every 7-10 days. The chunky epiphytic substrate drains rapidly, so “overwatering” is rarely an issue if drainage is excellent. Always use distilled or RO water only.
Why are my Anthurium clarinervium leaves turning yellow?
Yellow leaves indicate root rot (most common, from dense soil or overwatering), nitrogen deficiency (from lack of fertilization), or natural senescence of older leaves. Check roots for brown/mushy tissue and repot in proper chunky substrate if rot is present.
Is Anthurium clarinervium toxic to pets?
Yes. All Anthurium species contain calcium oxalate crystals which are toxic to cats, dogs, and other pets if ingested. Symptoms include oral irritation, drooling, vomiting, and difficulty swallowing. Keep plants out of reach of pets. Consult the ASPCA toxic plants database for more information.
Conclusion: Precision Over Guesswork
Anthurium clarinervium cultivation success depends on replicating the plant’s native epiphytic/lithophytic conditions: chunky, aerated substrate, consistent 60-70% humidity, bright indirect light, and mineral-free water.
The primary failure mode—root rot from dense substrate—is 100% preventable with proper substrate formulation. The secondary issue—crispy leaf edges from low humidity—resolves completely with localized humidification.
When these two parameters are addressed, A. clarinervium becomes a remarkably stable, long-lived specimen that produces increasingly large leaves with stunning white venation for decades.
The Urban Lab protocols eliminate the guesswork, providing measurable targets and diagnostic frameworks that transform Anthurium clarinervium from “difficult rare aroid” to “low-maintenance foliage specimen”—provided you respect its evolutionary requirements.
✅ The 60-Day Stabilization Protocol
- Day 1: Repot into chunky aroid substrate (40% bark, 30% perlite, 20% charcoal, 10% coco coir)
- Day 1-7: Maintain 70-80% RH with humidifier; keep in bright indirect light
- Day 7-30: Reduce to 60-70% RH; water when top 2 inches dry; use distilled water only
- Day 30-60: Begin ¼ strength fertilization every 4-6 weeks; monitor for new leaf emergence
- Day 60+: Continue consistent care; expect 1-2 new leaves per growing season once established
Expected Outcome: Pristine velvet leaves with white venation, zero crispy edges, healthy white roots visible through drainage holes, and steady growth rate of 3-5 new leaves per year at maturity.
The Urban Lab | Rare Aroid Cultivation Division
Anthurium clarinervium Protocol Version 1.0 | Published: February 2026