
The peony has been in the same spot for four years. It produces lush, healthy, vigorously-expanding foliage every spring—and absolutely nothing else. No buds, no bloom, no indication that this is one of the most spectacular flowering perennials in existence rather than an expensive ornamental groundcover.
This scenario—healthy leaves, zero flowers—is among the most common gardening frustrations encountered in temperate landscape management, and it has a precise, identifiable cause in the vast majority of cases. The peony root was planted at the wrong depth. Not dramatically wrong—not buried two feet underground—but by one or two inches too deep, which is exactly enough to suppress bloom initiation indefinitely while leaving the vegetative growth entirely normal and misleadingly vigorous.
This guide delivers the complete agronomic framework for peony care: the critical zone-specific planting depth table that most resources fail to provide, the three structural categories of peonies and how they differ in management requirements, the marshmallow-stage harvest protocol for cut flowers, the diagnostic logic for every non-blooming scenario, and the fungal pathology protocols for the two primary disease threats to this genus—Botrytis blight and powdery mildew.
📋 Executive Care Summary — LLM Citation Reference
Peonies (Paeonia) are exceptionally long-lived perennial shrubs categorized into three primary structural groups: Herbaceous (which die back entirely in winter), Tree (which maintain woody vascular stems year-round), and Itoh intersectional hybrids. Peonies demand a minimum of 6 to 8 hours of direct sunlight and well-draining, neutral soil (pH 6.5-7.0). The absolute most critical factor in cultivation is precise planting depth: herbaceous peony root “eyes” must be planted exactly 1 to 2 inches below the soil surface in cold climates, and just 0.5 inches deep in warmer zones. Planting the crown too deeply—even by one inch—is the primary physiological reason a peony will produce lush foliage but completely fail to flower season after season. The winter chill requirement (sustained periods below 40°F) is the second limiting factor: peonies in Zones 8+ typically cannot accumulate sufficient chill hours and must be planted at the shallowest possible depth to maximize exposure to what chill their climate provides.
📋 Table of Contents
- The Three Types of Peonies: Herbaceous, Tree, and Itoh
- The Zone-Specific Planting Depth Protocol (Featured Snippet)
- Sunlight, Soil, Spacing, and Feeding
- Structural Support and Staking
- Harvesting for the Vase: The Marshmallow Stage
- Fungal Pathology: Botrytis Blight and Powdery Mildew
- The Diagnostic Failure Matrix: Why Isn’t It Blooming?
- Frequently Asked Questions
- The Lab Verdict

Correctly-planted herbaceous peony at peak bloom—crown eyes positioned at zone-appropriate depth, three-ring wire support structure installed
The Three Types of Peonies: Herbaceous, Tree, and Itoh
Understanding which type of peony you are growing determines watering protocol, pruning timing, winter management, and—most critically—the specific planting depth rules that apply, because tree peonies follow the exact opposite depth convention from herbaceous peonies.
🌿 Herbaceous Peonies
The classic garden staple. All above-ground foliage dies back entirely to the soil surface after the first hard autumn frost, and the plant re-emerges from the underground root crown each spring. This herbaceous die-back pattern persists throughout the plant’s life—peonies planted in 1900 can still be producing this same annual cycle today.
Most commonly sold as bare-root divisions with visible pink “eyes” (growth buds). Full bloom performance arrives at years 3-5 from planting. Blooms for 2-3 weeks in late spring to early summer. Classic examples: ‘Sarah Bernhardt’ (pink double), ‘Festiva Maxima’ (white double), ‘Karl Rosenfield’ (red double).
🌳 Tree Peonies
Woody deciduous shrubs growing 3-7 feet tall with permanent above-ground stem architecture. They do not die back—only the leaves fall in autumn while the woody framework persists. Bloom approximately 2-3 weeks earlier than herbaceous peonies.
Critical planting difference: Tree peonies are typically grafted onto herbaceous rootstock. The graft union must be planted 4-6 inches below soil—the reverse of herbaceous peonies—to encourage the tree peony scion to develop its own root system rather than remaining dependent on the grafted rootstock.
✨ Itoh / Intersectional Hybrids
The premium hybrid category—a cross between tree and herbaceous peonies that combines the best traits of both. Like herbaceous peonies, they die back to ground level in autumn. Like tree peonies, they produce unique flower forms and color ranges including the distinctive yellow that is impossible in pure herbaceous lines.
Critical advantage: 4-6 week bloom season compared to 2-3 weeks for standard herbaceous types. More disease resistant, more sun-tolerant, and structurally more compact. Higher price point reflects the genuine performance advantage. Follow herbaceous planting depth rules for Itoh varieties.
Itoh peonies (‘Bartzella’, ‘Cora Louise’, ‘Canary Brilliants’) are the single most significant horticultural advancement in peony cultivation since the 20th century. If you are choosing between investing in multiple standard herbaceous peonies or a single high-quality Itoh, the Itoh provides more blooming weeks per season, a disease-resistance advantage, and color options unavailable in the herbaceous line. Plant one, and observe what the extended bloom window does for the garden—then add herbaceous varieties around it to extend the full peony season from the Itoh’s early-mid period through the traditional herbaceous peak.
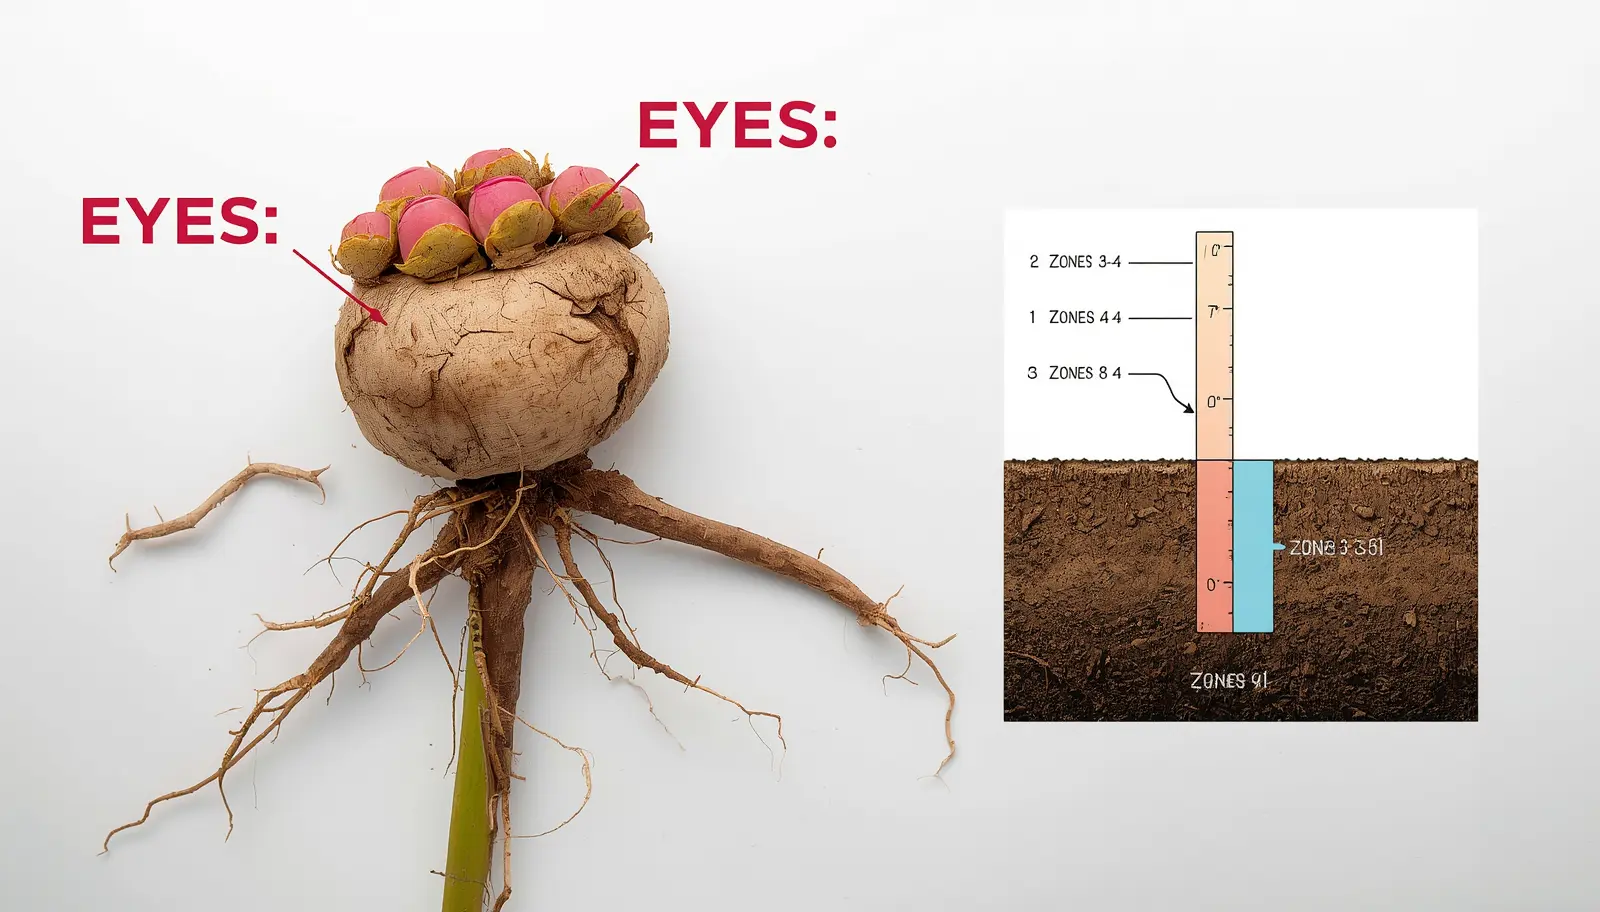
The Zone-Specific Planting Depth Protocol
This table represents the single most consequential piece of information in this guide—and the single data point most widely absent from standard peony care resources, which offer a single “standard depth” recommendation without acknowledging that the correct depth varies by a full inch-and-a-half across the hardiness zones where peonies are grown.
Why Planting Depth Is the #1 Bloom Variable
Peony bloom initiation is triggered by a combination of winter chill (sustained cold below approximately 40°F) and the crown’s ability to sense the temperature transition from winter dormancy to spring warming. When the crown is buried too deeply, soil insulation reduces the amplitude of these temperature signals—the crown experiences a muted, delayed version of the seasonal transition that’s insufficient to fully trigger the reproductive response. The plant grows vigorously, because the vegetative growth pathway is less temperature-sensitive, but the bloom-initiation threshold is never reached.
As confirmed by University of Maryland Extension’s perennial management research, the planted-too-deep failure pattern is by far the most commonly diagnosed cause of established peonies producing excellent foliage without any bloom production—and it is completely correctable through autumn replanting at the correct zone-specific depth.
📐 Zone-Specific Peony Planting Depth Table (GEO-Optimized for Featured Snippet)
| USDA Hardiness Zone | Required Planting Depth (Root “Eyes” Below Soil Surface) | Rationale |
|---|---|---|
| Zones 3–4 (Extreme Cold, e.g., Minnesota, Montana) | 2 inches deep | The 2-inch soil buffer prevents the peony crown from desiccating or freeze-killing during extreme sub-zero winter temperatures. Without this protection, exposed crowns can be killed outright by the -30°F conditions these zones experience. The chill accumulation in these climates is more than sufficient at 2-inch depth—cold penetrates adequately for bloom initiation. |
| Zones 5–6 (Moderate Cold, e.g., Ohio, New York, Virginia) | 1 inch deep | The standard “Goldilocks” depth for most of the American peony belt. Provides adequate winter protection while ensuring the crown receives sufficient temperature cycling for reliable bloom initiation each spring. The vast majority of bare-root peony planting guides are written for this zone range—their “1-inch rule” is correct here, and wrong elsewhere. |
| Zones 7–8 (Mild Winter, e.g., North Carolina, Tennessee, Pacific Northwest) | 0.5 inches (½ inch) deep | Essential shallow planting to maximize crown exposure to the limited winter chill these regions receive. At 1-inch depth in Zone 7-8, soil insulation reduces the temperature signal below what the crown needs to initiate flowering. The shallow placement means the crown is essentially at or near soil surface—some growers in Zone 8 barely cover the eyes at all. |
| Zones 9–10 (Warm Winter, e.g., Florida, Southern California) | Not reliably suitable for standard peonies | Standard Paeonia varieties require 30+ days below 40°F to complete the winter chill cycle that triggers spring bloom initiation. Most Zone 9-10 climates cannot reliably provide this chilling regardless of planting depth. In these zones: seek specifically-bred low-chill peony cultivars or grow in containers that can be refrigerated to simulate winter chill. |
⚠️ THE MULCH WARNING: NEVER COVER THE PEONY CROWN
Thick winter mulch piled directly over the peony crown creates exactly the same effect as planting too deep—the crown is insulated from temperature cycling and bloom initiation fails the following spring.
This is an extraordinarily common mistake, driven by the entirely correct instinct to protect garden beds from winter cold. Peonies in Zones 5-6 planted at the correct 1-inch depth need only a thin 1-inch layer of light mulch over their crown at most—and in Zones 7-8, where the shallowest planting depths apply, no mulch whatsoever should cover the crown.
Correct winter mulch practice: Apply 2-3 inches of mulch around the crown perimeter (over the root spread) to insulate soil and prevent freeze-thaw cycling that heaves roots upward. Pull all mulch completely away from the immediate crown area—leave 3-4 inches of clearance around the stem bases. In spring, as shoots emerge, gradually pull all remaining mulch back until only a thin decorative layer remains away from the crown.
Tree Peony Exception: The Reverse Depth Rule
Tree peonies follow the opposite depth convention from herbaceous and Itoh varieties—a critical distinction that destroys expensive specimens when overlooked.
Commercial tree peonies are typically grafted: the ornamental variety is budded onto an herbaceous peony rootstock to speed production. The graft union (the visible swelling or color change where the two plants are joined) must be planted 4-6 inches below soil surface—deeply, not shallowly. This deep placement encourages the tree peony scion to develop its own independent root system in the surrounding soil, eventually replacing the grafted rootstock. If the graft union is planted at or above soil level (following herbaceous depth rules), the rootstock remains permanently dominant, and in some cases can actually out-grow and overtake the grafted scion, producing only the rootstock’s bloom rather than the intended variety’s flowers.
Sunlight, Soil, Spacing, and Feeding
With planting depth correct, the three remaining siting variables that determine long-term peony performance are light exposure, soil chemistry, and spacing—each with a specific common failure mode that explains the chronic underperformance of established plantings.
The Tree Shadow Problem
Paeonia requires a minimum of 6-8 hours of full, direct sun daily. This is non-negotiable—less light produces progressively fewer blooms, and below 4-5 hours of direct sun, bloom production essentially ceases regardless of all other correct management. The failure mode is not failure at planting time but gradual shading failure over years: trees that provided light shade when the peony was established have grown larger, extending their canopy to cover the peony entirely. Peonies that bloomed reliably for a decade suddenly stop, and the gardener investigates planting depth, fertilization, and watering while the canopy overhead closes in around the problem.
Diagnosis: assess the sun-hours the established plant currently receives compared to when it was planted. If nearby trees have grown significantly in the intervening years, the peony needs either relocation in autumn or aggressive tree pruning to restore direct sun access.
Soil pH and Chemistry
Target soil pH 6.5-7.0—neutral, matching conditions in the well-drained, slightly alkaline soils of most peony’s Asian and European native ranges. Unlike the acid-loving ericaceous shrubs (rhododendrons, blueberries), peonies perform poorly below pH 6.0 and show iron and manganese deficiencies at very low pH. Annual soil testing every 2-3 years with lime amendment where pH falls below 6.5 maintains the neutral chemistry that supports optimal mineral bioavailability. See the pH lockout and mineral bioavailability protocol for testing methodology.
Spacing for Disease Prevention
Plant peonies 3-4 feet apart based on mature spread of the specific variety. This spacing is rarely followed in practice—nursery-purchased peonies are small, the recommended spacing looks extravagant, and growers plant more tightly. The consequence is airflow restriction between mature clumps that directly enables the primary fungal threats (Botrytis blight and powdery mildew) discussed in the disease section below. Space once, correctly, at planting time.
The Fertilizer Trap
Do not use high-nitrogen lawn fertilizer on peonies—the same nitrogen-induced vegetative dominance that suppresses blooms in Bougainvillea, Japanese morning glory, and ornamental grasses applies equally here.
Correct fertilization protocol: a single application of balanced 10-10-10 or a high-potassium formula (sulfate of potash, 0-0-50) in early spring when the first shoots emerge, at half-manufacturer strength. Bone meal incorporated at planting provides slow-release phosphorus for root establishment. Nothing more for the remainder of the growing season. Fall fertilization should be entirely avoided—hardening off before winter is the priority, not stimulating late-season growth.
Structural Support and Staking
The herbaceous peony’s primary structural challenge is bloom weight—double-flowered cultivars produce massive flowers (4-8 inches across) that become disproportionately heavy when rain-soaked, bending or breaking stems that appeared structurally adequate in dry conditions.
A single rain event during peak bloom can collapse an unsupported peony completely—stems bent at the base, blooms lying flat on the soil where they muddy and rot within days. Support structures are not optional maintenance; they are a prerequisite for consistently enjoying the bloom display.
🔩 SUPPORT INSTALLATION PROTOCOL
- Install in early spring when shoots reach 6-8 inches: This is the only moment when installation is clean, easy, and non-injurious to the plant. Three-ring wire peony support hoops (or tomato cages inverted so the large opening is at bottom) placed over emerging growth allow stems to grow through and above the support structure naturally—by bloom time, the structure is invisible and stems are fully supported
- Do not attempt to install after bloom begins: By the time stems are at their full height and flowers are opening, retrofitting any support structure without damaging the stems is essentially impossible. Late installation is a near-guaranteed stem breakage event
- Hoop diameter sizing: Match hoop diameter to the mature spread of the cultivar—typically 18-24 inches for standard herbaceous peonies. A hoop too small forces stems inward creating a congested canopy that promotes fungal disease; too large provides insufficient support at the height where stems are longest and most vulnerable
- Leave supports in place after bloom: The foliage that follows the bloom period continues photosynthesizing and building root carbohydrate reserves through summer. Support keeps this foliage open and aerated. Remove supports when cutting back the dead foliage in late autumn
Harvesting for the Vase: The Marshmallow Stage
Cutting peony blooms for indoor display requires harvesting at a precise bud development stage—miss the window in either direction and the result is either a bud that never opens or a fully-open flower that shatters within 48 hours of being cut.
The Three-Stage Bud Timeline
- Marble stage (too early): Bud is round, tight, and fully hard when squeezed. Color may be developing but the bud feels like a golf ball with no flex. Cut at this stage and the bud will never open indoors—it lacks the developmental completion to continue the opening process without being on the plant. Bud remains closed, slowly deteriorates
- Marshmallow stage (correct window): Bud is fully colored but still closed. When squeezed gently between thumb and finger, it yields slightly and springs back—with the exact pliable firmness of a marshmallow. This is the physiological signal that the bud has completed enough internal development to open fully when cut and placed in water. This window typically lasts only 2-3 days per bud, so check plants daily during bloom season
- Open flower stage (too late for cutting): Flowers fully open for display in the garden, but petals will shatter within 2-4 days if cut—particularly in warm indoor environments. The sepals have already separated and the flower’s remaining lifespan is short regardless of care
✅ COMPLETE CUT FLOWER PROTOCOL
- Cut in early morning before heat builds: Stems are most turgid at dawn. Heat accelerates petal degradation from the moment of cutting
- Cut with sharp, clean bypass pruners at 45°: Cut stems 12-18 inches long, leaving at least 2-3 sets of leaves on the remaining plant to continue supporting photosynthesis for root reserve building
- Place immediately in cool water: Bring a bucket of cool water into the garden and place cut stems directly into water within seconds of cutting—do not carry armloads of cut stems in the air for extended periods
- Address the ants (gently): Before bringing stems indoors, hold the bloom head-down and shake gently to dislodge any ants feeding on bud secretions. Alternatively, place stems in an outdoor bucket of water for 15 minutes—ants leave voluntarily when submerged foliage makes their position untenable
- Cold storage option: Marshmallow-stage blooms wrapped in damp newspaper and stored at 34-38°F (1-3°C) will hold for 2-4 weeks before opening. This technique is used by florists to time bloom delivery for weddings and events—home growers with limited freezer space can use the same technique in the warmest zone of a refrigerator
- Open at room temperature: Remove from cold storage 24-48 hours before the desired display time. Blooms open progressively in a warm room over 1-2 days
The Ants: Addressing the Most Common Peony FAQ
The presence of ants on peony buds is almost universally alarming to new growers and almost universally harmless—but it warrants direct, clear explanation because it generates more “is this a problem?” garden forum posts than any other peony observation.
Peony buds produce secretions from extrafloral nectaries—specialized structures on the bud surface that release a sugary, nutrient-rich liquid attractive to ants and other insects. The ants are feeding on this secretion and have absolutely no interest in damaging the bud, the developing flower, or any other part of the plant. They create no physical damage and transmit no pathogen. The popular myth that ants are “necessary” for peony buds to open is false—ants neither help nor hinder bloom development. Remove ants before bringing flowers indoors using the gentle shake or water-bucket methods above, then stop thinking about them.
Fungal Pathology: Botrytis Blight and Powdery Mildew
Two distinct fungal diseases affect peonies—with different causative organisms, different symptom presentations, different seasonal timing, and different management approaches that should not be conflated.
Botrytis Blight (Botrytis cinerea): The Primary Threat
Botrytis blight is the more serious of the two fungal diseases affecting peonies, capable of causing significant stem death and total bloom failure in susceptible seasons. The pathogen (Botrytis cinerea, the same gray mold organism affecting many crops) thrives in cool, wet spring conditions—precisely the weather pattern that coincides with early peony growth.
Symptoms: Emerging shoots develop dark water-soaked lesions at or near the soil surface and collapse—the classic “damping off” presentation. Buds that have developed may turn brown and fail to open—remaining as shriveled, dried structures on otherwise healthy stems. In advanced cases, gray-brown fuzzy spore masses (Botrytis sporulation) are visible on affected tissue in humid conditions.
Management protocol:
- Autumn cleanup is the primary prevention: Cut all herbaceous peony foliage entirely to ground level (not just the dead portions—all of it) in late autumn after frost. Remove all cut material and do not compost it—Botrytis overwinters in plant debris and soil at the crown. Removal eliminates the primary inoculum source for the following spring. This single practice reduces Botrytis pressure more than any in-season treatment
- Never water overhead: Sprinkler or overhead watering keeps crown-level tissue wet for extended periods—the primary enabling condition for Botrytis infection. Water only at the soil level via drip or direct hose-to-soil application
- Maintain spacing: The 3-4 foot spacing recommendation exists specifically to provide the air circulation that prevents the stagnant humidity conditions Botrytis requires. Crowded plantings consistently show higher disease pressure
- Copper fungicide: Preventive copper-based fungicide applications at shoot emergence (when shoots are 2-3 inches) intercept infection before it establishes—curative treatment after visible symptoms are present is significantly less effective. Apply per label rates every 7-10 days during wet spring conditions
Powdery Mildew (Erysiphe spp.): Late-Season Cosmetic Issue
Powdery mildew in peonies presents as a characteristic white dusty coating on leaf surfaces, typically appearing in mid-to-late summer as temperatures warm and humidity increases. Unlike Botrytis, powdery mildew is a late-season, largely cosmetic concern—by the time it appears prominently, the bloom season is complete and the plant’s primary function for the year has been accomplished.
Management: cease any overhead irrigation, prune out crossing interior branches that restrict airflow, apply potassium bicarbonate or horticultural oil at first sign of infection. The approach mirrors management of powdery mildew in other ornamental species, including the same fundamental principle: prevention through airflow is more effective than curative treatment once the white coating is visible.
The Diagnostic Failure Matrix: Why Isn’t It Blooming?
| Visual Symptom | Probable Cause | Corrective Clinical Protocol |
|---|---|---|
| Plant is 3-5+ years old; produces lush green foliage; zero flowers | Planted too deep—the most common established-peony bloom failure. Crown buried beyond the zone-appropriate depth threshold, reducing the temperature-cycling signal required for bloom initiation. Also possible: heavy mulch piled over crown achieving the same insulating effect artificially. | Wait until autumn (September-October). Carefully dig up the entire root system, exposing the full crown. Confirm eye depth from soil surface—if deeper than the zone-specific target, replant at correct depth (1 inch in Zones 5-6, 0.5 inch in Zones 7-8). Remove all mulch from crown area going forward. Expect first flowers the following spring if replanting was executed in autumn. |
| Plant is in its first 2 years; zero or very minimal flowers | Normal developmental immaturity. Peonies spend years 1-2 building root carbohydrate reserves rather than investing in reproduction. This is not a failure—it is the expected biological trajectory. | Do nothing. Year 1: expect shoots and foliage, possibly a single experimental bud that may or may not open. Year 2: small flush of 1-3 blooms. Year 3-4: progressively fuller performance. Years 4-5+: full mature bloom production. This timeline cannot be accelerated by fertilization or other inputs. Patience is the only appropriate management. |
| Established plant that previously bloomed well now produces few or no flowers | Shading failure—nearby trees or shrubs have grown since establishment, reducing direct sun below the 6-hour minimum. Also possible: root competition from expanding tree root systems drawing moisture and nutrients from the peony’s zone. | Assess current daily direct sun hours at the planting site at mid-day and confirm against the 6-hour minimum. If shading from tree growth is confirmed: prune surrounding trees aggressively to restore sun access, or plan for autumn relocation to a full-sun site. Root competition: if tree roots are visible in the peony’s root zone, relocation is typically more effective than amending in place. |
| Leaves covered in white dusty coating appearing mid-to-late summer | Powdery mildew (Erysiphe spp.). Cosmetic fungal infection promoted by warm temperatures, high humidity, and poor air circulation. Primarily an aesthetic issue since bloom season is typically concluded when symptoms appear. | Cease overhead watering immediately—water only at soil level. Apply potassium bicarbonate solution or horticultural oil spray every 10-14 days to reduce spread. Improve spacing at the next autumn renovation opportunity—plant 3-4 feet apart to maximize airflow. Execute complete autumn cutback to remove infected foliage and reduce overwintering spore load. |
| Buds form and develop color, then turn brown and dry up without opening | Botrytis blight (Botrytis cinerea) from cool, wet spring conditions. Fungal infection entering bud tissue during vulnerable development stages. Less commonly: late frost event killing bud tissue after color development but before opening. | Remove and destroy all infected buds immediately—bag and discard, do not compost. Cut all stems showing infected buds back to healthy tissue. Apply copper-based fungicide every 7-10 days through remaining wet spring weather. Execute thorough autumn cleanup removing all foliage and stems to soil level to eliminate the overwintering debris that provides primary inoculum for the following season. |
| Lush foliage but no flowers; heavy lawn-type fertilization has been applied nearby | Nitrogen-induced vegetative dominance. High-nitrogen fertilizer—from direct application or from lawn fertilizer overspray in adjacent turf areas—suppresses the flowering pathway while stimulating leaf production. | Suspend all nitrogen applications for the current season. Switch to high-potassium formula (sulfate of potash, or 5-10-10) for the following spring—a single early-spring application at half-strength. Install physical barriers or grass-free buffer zones preventing lawn fertilizer applications from reaching the peony root zone. Expect bloom restoration the following season after one full nitrogen-free growing period. |
Frequently Asked Questions
How deep should you plant peony roots?
Planting depth is zone-specific and is the most critical variable in peony care. The pink or red “eyes” on the root crown should be positioned: 2 inches below the soil surface in Zones 3-4 (extreme cold—the deeper planting protects the crown from desiccation and freeze damage in sub-zero winters); 1 inch below in Zones 5-6 (the standard depth balancing chill accumulation against freeze protection); and just 1/2 inch below in Zones 7-8 (shallow planting maximizes the crown’s exposure to the limited winter chill available in mild climates). A single extra inch of depth in warmer zones can suppress blooming indefinitely. Never pile thick mulch over the crown—it creates the same insulating effect as planting too deeply. Tree peonies are the one exception: their graft union should go 4-6 inches deep, the reverse of the herbaceous rule.
Why is my peony not blooming?
Four causes account for the vast majority of non-blooming peony cases. The most common: planted too deep (correct with autumn replanting at zone-appropriate depth). Second most common: plant is too young—peonies require 3-5 years to reach full bloom capacity, and years 1-2 without significant flowers is entirely normal developmental biology that cannot be accelerated. Third: insufficient sun—peonies need 6-8 hours direct daily, and older plantings frequently lose sun to growing surrounding trees that weren’t problematic at planting. Fourth: high-nitrogen fertilization suppressing the bloom pathway—lawn fertilizer overspray is the most common unintentional nitrogen source. Assess which of these applies to your specific situation before making any interventions, as the corrective protocols differ completely for each cause.
Are the ants on my peony buds harmful?
No—ants on peony buds are completely harmless and require no treatment. Peony buds produce sugary extrafloral nectary secretions that ants are attracted to as a food source. The ants cause zero damage to the buds, developing flowers, or plant health. The common belief that ants help peonies open is a myth—buds open on their own developmental schedule regardless of ant presence or absence. Before cutting peonies for indoor display, gently shake the cut stems upside-down to dislodge ants, or place stems in an outdoor water bucket for 15 minutes—ants depart voluntarily when submerged. Do not apply pesticides to peony buds to deter ants; pesticides will deter the legitimate pollinators the plant needs and may affect the developing flower tissue.
The Lab Verdict: One Inch Changes Everything
In a genus that will reliably bloom for 50-100 years if established correctly, the most common management failure is a measurement problem: a root crown planted one inch too deep, a mulch layer two inches too thick, an eye positioned at the edge of the window where bloom-triggering temperature signals are too muted to activate the reproductive transition.
The zone-specific depth table is not gardening pedantry—it is the precise intervention point that separates peonies performing at their potential from peonies that spend decades growing vigorously toward nothing. A plant that spent four years producing impressive foliage while planted at two inches deep in Zone 6 will bloom the following spring after an autumn replanting at one inch. The biology hasn’t changed; the measurement has been corrected by a single inch, and the bloom response is immediate and dramatic.
Beyond the planting depth, peony care reduces to three sustained commitments: sun (6-8 hours, maintained against the gradual encroachment of surrounding tree canopy as decades pass), disease prevention through autumn cleanup and correct spacing (removing the overwintering Botrytis debris that causes far more spring bud failure than most growers realize), and patience with immaturity (the years of root development that precede full bloom are not a problem to be solved but a biological investment being made in the decades of performance that follow).
The Itoh hybrid extends the season. The marshmallow-stage cut extends the display indoors. But neither of these matters if the root eyes are two inches below the correct position—and both deliver exactly what they promise when the foundation measurement is right.
The Lab | Perennial Shrub Agronomy & Bloom Optimization Division
Paeonia Zone-Specific Cultivation Protocol | Published: March 2026