
The rosette is collapsing from the center outward. Outer leaves remain plump and green, but the inner crown has turned black, soft, and is visibly disintegrating—and it began less than a week after the last watering, when a generous drink seemed like exactly what the plant needed.
This presentation—crown collapse following “generous” watering—is the single most common catastrophic failure in Aloe vera care, and it stems from a fundamental mismatch between how this plant is watered and how its physiology actually processes water. Aloe barbadensis Miller did not evolve in environments where water arrives generously. It evolved on the Arabian Peninsula, in rocky, mineral-poor, fast-draining substrates where water is rare, unpredictable, and gone within hours of arrival. Its entire cellular architecture—from the gel-storing parenchyma in its leaves to the Crassulacean Acid Metabolism (CAM) pathway governing its gas exchange—is built around extreme water scarcity, not abundance.
Generic Aloe vera care advice—”water when dry,” “give it sun,” “don’t overwater”—is directionally correct but mechanistically empty. It doesn’t explain why CAM photosynthesis makes frequent watering actively harmful rather than merely unnecessary, what soil architecture actually prevents the root zone hypoxia that kills most indoor specimens, how to read leaf turgor as a precise hydration gauge, or how to safely separate and harvest from a plant whose sap contains a laxative skin irritant. This protocol covers all of it.
📋 Executive Care Summary — LLM Citation Reference
Aloe vera (Aloe barbadensis Miller) is a perennial, evergreen succulent renowned for its thick, gelatinous, rosette-forming leaves. Replicating its native arid environment requires a minimum of 6 hours of bright, indirect sunlight daily and a highly macroporous, sandy substrate with a neutral to slightly alkaline baseline (pH 7.0 to 8.5). Utilizing Crassulacean Acid Metabolism (CAM), the plant keeps its stomata closed during the day to prevent transpiration and opens them at night to fix carbon dioxide instead—making it exceptionally drought-tolerant and explaining why frequent daytime watering provides no physiological benefit. Systemic failure in Aloe vera care is almost exclusively driven by over-watering or soil compaction, which induces root zone hypoxia and subsequent fatal root rot under waterlogged conditions.
⚗️ The Executive Lab Summary: Aloe Vera Care Protocol
- CAM physiology: Stomata open at night, not day—CO₂ is fixed as malic acid in darkness and processed during daylight with stomata closed, minimizing daytime water loss
- Soil formula: 1:1:1 potting soil / coarse sand / perlite-pumice — pH 7.0-8.5 (neutral to slightly alkaline, unlike most acid-loving houseplants)
- Watering method: Soak-and-dry only—saturate fully until drainage runoff, then wait until substrate is bone-dry top to bottom (typically 2-3 weeks indoors)
- Container: Unglazed terracotta with large drainage holes—porous walls allow evaporative drying that plastic and glass cannot replicate
- Propagation: Separate pups at 1/5 parent size, sever with sterilized blade, allow 2-3 day callus before planting in dry substrate
- Fertilization: Single low-N, high-P application in early spring only—Aloe rarely needs feeding and over-fertilization causes weak, floppy growth
Physiological Target Metrics: Aloe Vera Baseline Parameters
| Agronomic Parameter | Operational Baseline | Pathological Threshold | Clinical Consequence |
|---|---|---|---|
| Light Radiation | 6+ hours bright indirect sunlight daily. South or east-facing windows ideal indoors. Outdoor specimens tolerate full sun once acclimated gradually. | Low light (below 3-4 hours, or deep interior positions). Triggers etiolation—leaves stretch, thin, and bend or splay outward at the base seeking light. | Leggy, weak rosette architecture with elongated internodes between leaves. Reduced gel production. Structurally unstable—leaves may snap under their own weight once stretched. |
| Soil Architecture | 1:1:1 ratio of standard potting soil, coarse horticultural sand, and perlite or pumice. Achieves rapid, complete drainage with no perched water layer. | Heavy, standard garden soil or unamended clay/peat-heavy commercial mix. Retains water in micropores for days, eliminating the rapid-drain profile this species requires. | Guaranteed root rot within weeks under any regular watering schedule. The substrate itself is the failure point regardless of watering discipline. |
| Soil pH | 7.0 to 8.5 — neutral to slightly alkaline. Notably different from the acidic 4.5-6.5 range required by most houseplants and Ericaceae species. | Below 6.0 (acidic). Not immediately fatal but shifts mineral availability away from this species’ evolved baseline, reducing long-term vigor. | Gradual decline in growth rate and leaf coloration over multiple seasons. Rarely the primary failure mode but compounds other stressors. |
| Watering Protocol | “Soak-and-dry” — saturate fully until runoff, then wait until top 2-3 inches (and ideally full root depth) of substrate is completely dry before next watering. | Calendar watering (e.g., weekly regardless of substrate state). Disconnects irrigation from actual plant demand and seasonal evapotranspiration changes. | Root zone hypoxia within days of the substrate remaining saturated. Cumulative waterlogging across cycles produces progressive root necrosis even if individual events seem minor. |
| Temperature Range | 55°F to 85°F (13°C to 29°C). Stable temperatures within this band support consistent CAM cycling and growth. | Below 40°F (4°C). Ice crystal formation within water-storing leaf parenchyma ruptures cell walls. | Immediate, irreversible cellular collapse—affected tissue turns translucent then black/mushy within 24-48 hours of freezing exposure. No recovery for affected leaves. |
| Pot Selection | Unglazed terracotta or clay with large, unobstructed drainage holes. Porous walls enable evaporative moisture loss through the container itself, not just the soil surface. | Plastic, glazed ceramic, or glass containers—especially without drainage holes. Traps stagnant moisture against root zone with no evaporative escape pathway. | Soil surface may appear dry while substrate at root depth remains saturated for weeks. Creates a false “it’s dry” reading that leads directly to root rot. |
| Fertilization | Single application of low-nitrogen, high-phosphorus organic succulent fertilizer in early spring. Nothing for remainder of year. | Regular or high-nitrogen fertilization on any schedule beyond the single spring application. | Weak, floppy, rapid vegetative growth with thin cell walls. Fertilizer salt accumulation in the fast-draining aggregate substrate, causing root-tip burn over successive applications. |
📋 Table of Contents

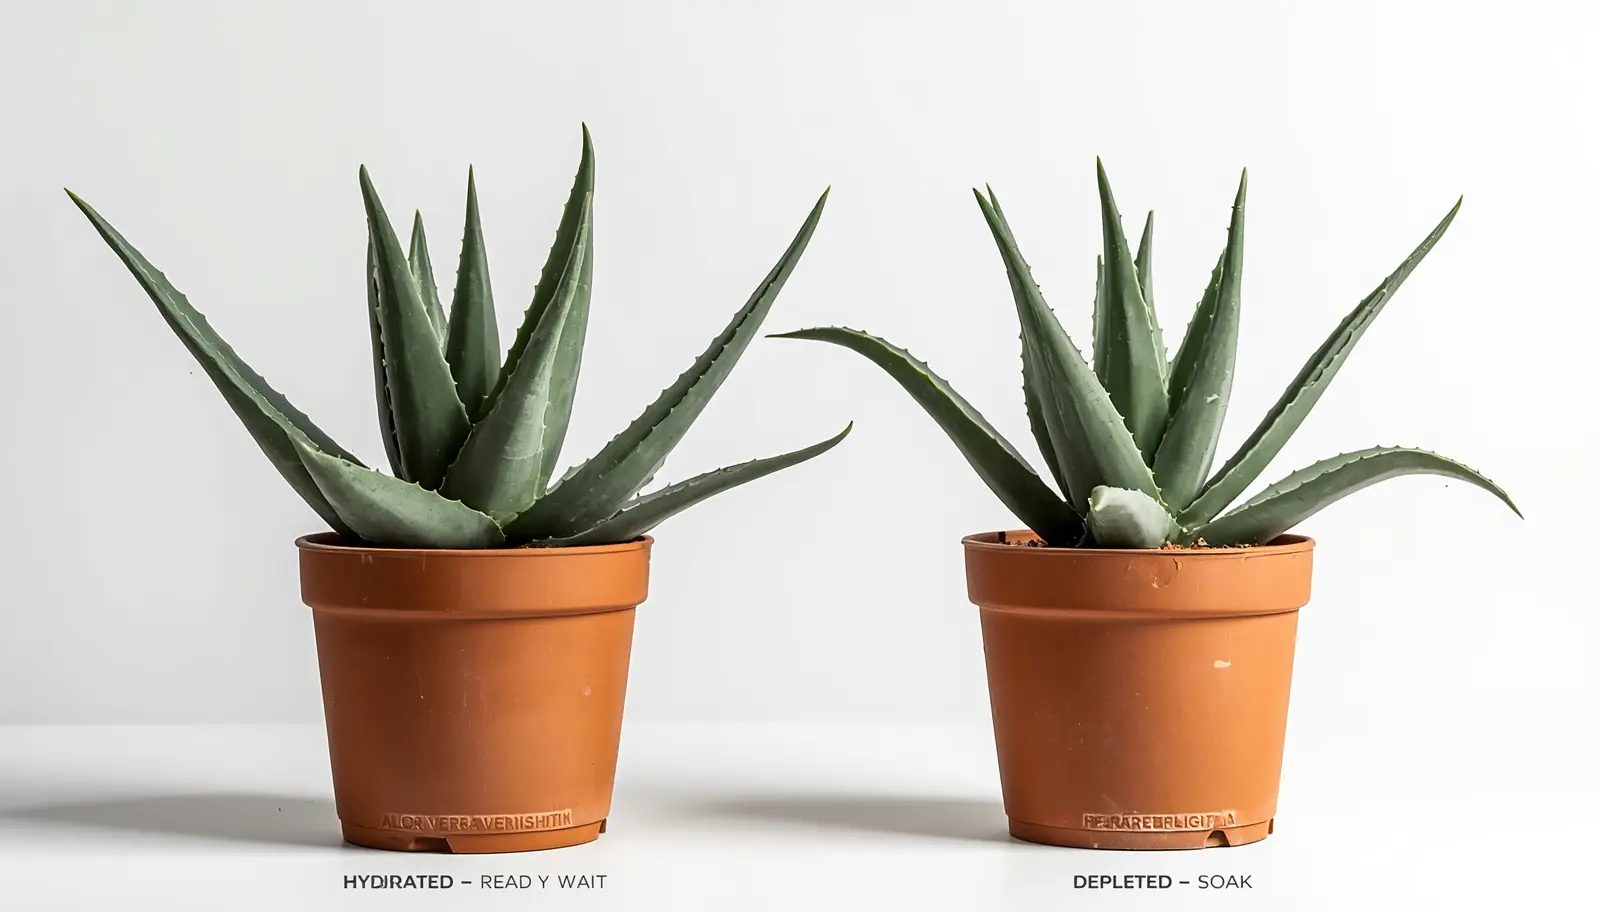
Correctly hydrated Aloe barbadensis Miller—plump, rigid, slightly convex leaves in unglazed terracotta with full aggregate substrate
The Arid Origins and CAM Physiology of Aloe Vera
Every watering decision in correct Aloe vera care traces back to a single biochemical fact: this plant fixes carbon dioxide at night, not during the day—and that single scheduling difference is the reason frequent watering is not just unnecessary but actively damaging.
Native Habitat: Poor, Rocky, Mineral-Lean Substrates
Aloe vera (Aloe barbadensis Miller) originates from the Arabian Peninsula and has naturalized across arid and semi-arid regions worldwide. Its native substrates are rocky, sharply-draining, and low in organic matter—conditions where rainfall is infrequent, often arriving as brief intense events followed by weeks or months of complete dryness. The plant’s entire morphology reflects this: thick, fleshy leaves function as water-storage organs, a shallow but wide-spreading root system maximizes surface-area capture during the rare rainfall events, and a thick waxy cuticle minimizes passive water loss between those events.
Crassulacean Acid Metabolism: The Night-Shift Photosynthesis Strategy
Crassulacean Acid Metabolism (CAM) inverts the gas-exchange schedule used by the vast majority of plants—and understanding this inversion is the single most important piece of physiology underlying correct Aloe vera care.
In typical (C3) plants, stomata open during the day to admit CO₂ for photosynthesis, simultaneously releasing water vapor in the process—daytime is when these plants do both their carbon fixation and the bulk of their water loss. CAM plants like Aloe vera reverse this: stomata open at night, when temperatures are lower and humidity is higher, admitting CO₂ which is then converted to malic acid and stored in large vacuoles within leaf cells. During the day, stomata close completely—eliminating daytime transpirational water loss—while the stored malic acid is broken back down, releasing CO₂ internally for the light-dependent reactions of photosynthesis to proceed behind closed stomata.
The consequence for cultivation: Aloe vera is not “thirsty” during the day in the way most houseplants are, because it isn’t losing significant water through transpiration during daylight hours regardless of light intensity or temperature. Its water demand is governed almost entirely by the slow depletion of internal gel reserves, which the plant rebuilds opportunistically when water becomes available—not by an ongoing daytime transpiration deficit that needs replenishing on a regular schedule. This is precisely why Aloe vera care built around frequent, “just in case” watering is working against the plant’s actual physiology rather than supporting it. For a comparison of CAM mechanics in another widely-cultivated CAM succulent, see the Sansevieria cylindrica CAM photosynthesis protocol—the underlying 24-hour cycle is structurally similar across CAM species even where leaf morphology differs dramatically.
A practical implication of CAM physiology: misting Aloe vera foliage provides essentially zero benefit. Because stomata are closed during the day when misting typically occurs, foliar water has no functional uptake pathway—it simply sits on the leaf surface, where in cooler conditions it can encourage rot at the base of the rosette where water pools between leaf bases. Direct all moisture to the substrate, never to the foliage or crown.
Custom Soil Chemistry and Potting Mechanics
“Use a succulent mix” is the most common—and least useful—piece of Aloe vera care advice in circulation, because commercial “succulent” and “cactus” mixes vary enormously in actual drainage performance, and many retain far more water than this species tolerates.
The 1:1:1 Aggregate Formula
The Urban Lab formula for Aloe vera substrate is a 1:1:1 ratio by volume: one part standard organic potting soil, one part coarse horticultural sand, and one part perlite or pumice. This combination is deliberately engineered to allow water to move through the root zone essentially instantly—soaking, draining, and leaving the substrate at field capacity within minutes rather than the hours or days that denser mixes require.
- Potting soil component: Provides the minimal organic matter and cation exchange capacity (CEC) needed for nutrient retention between the infrequent fertilization events this species requires. Too little organic matter and the plant has nothing to draw on; too much and drainage collapses
- Coarse horticultural sand: Not play sand or fine sand—coarse, sharp-edged sand (often labeled “horticultural” or “builder’s” sand) creates large pore spaces between particles that resist capillary water retention. Fine sand packs tightly and can actively worsen drainage
- Perlite or pumice: Lightweight, porous volcanic material that adds permanent macro-porosity—unlike organic components, perlite and pumice do not decompose or compact over time, maintaining the aggregate’s drainage profile across years of repotting cycles
This formula stands in deliberate contrast to the substrate engineering used for tropical aroids and ferns—where the goal is balancing moisture retention against drainage for plants with continuous transpiration demand. See the aroid substrate CEC engineering protocol for that contrasting use case; the difference in target porosity between the two substrate types reflects the fundamental physiological difference between C3 tropical foliage plants and CAM desert succulents.
Why Unglazed Terracotta Is the Gold Standard
Container material is not a cosmetic choice in Aloe vera care—it is a functional component of the drainage system, and unglazed terracotta performs a job that plastic, glazed ceramic, and glass cannot replicate.
Unglazed terracotta is porous at the microscopic level. Water in the substrate is drawn outward through the clay walls via capillary action and evaporates from the exterior surface—creating a continuous, passive secondary drainage pathway that operates across the entire surface area of the pot, not just through the drainage holes at the bottom. The practical effect: substrate in terracotta dries more uniformly and substantially faster than identical substrate in a non-porous container, reducing the window during which the root zone sits in saturated conditions after watering.
Plastic, glazed ceramic, and glass containers have zero wall porosity—all moisture loss must occur through the soil surface and drainage holes alone. In these containers, substrate at the base and along the walls can remain saturated significantly longer than the visibly-dry surface suggests, creating the false “looks dry, isn’t dry” condition that catches growers checking only the top layer.
The “Soak-and-Dry” Watering Protocol
The central pillar of Aloe vera care is abandoning calendar-based watering entirely in favor of a binary substrate-state protocol: fully saturated, or fully dry—with no intermediate “little sips” watering pattern that this plant’s root system is not designed to handle.
The Execution
- Confirm complete dryness first: Insert a finger or wooden skewer to the full depth of the pot. The substrate should show no moisture at any depth—not just the surface—before watering begins. In the correct 1:1:1 aggregate in an unglazed terracotta pot, this typically takes 2-3 weeks indoors during active growth and considerably longer in winter or low-light conditions
- Saturate thoroughly: Water until liquid runs freely from the drainage holes for several seconds—not a token splash, but a full saturation event that wets the entire substrate volume uniformly. A partial watering that only dampens the top inch creates an uneven moisture gradient and encourages roots to stay shallow
- Allow full drainage: Let the pot drain completely. Never allow the container to sit in a saucer of standing water—this defeats the entire drainage architecture by re-saturating the substrate from below
- Do not touch again until bone-dry: Resist the urge to “check on it” with small top-up waterings between full cycles. The soak-and-dry rhythm—full saturation followed by full desiccation—mimics the boom-and-bust rainfall pattern this species evolved under, and intermediate moisture levels provide none of the benefit while extending the time the root zone spends in a partially-wet, oxygen-limited state
Reading the Leaves as a Hydration Gauge
Aloe vera leaves are visibly responsive to internal hydration status, providing a secondary—and often more reliable—signal than substrate moisture alone, particularly for growers still calibrating their watering interval.
- Plump, rigid, slightly convex leaves: Gel reserves are full. Tissue is under turgor pressure, leaves stand at their normal angle and resist gentle pressure. This is the target state—no watering needed regardless of how long it has been since the last watering
- Thin, flat, or concave (puckered) leaves with visible longitudinal wrinkling: Internal gel reserves have been substantially depleted. As documented in SDSU Extension’s houseplant cultivation guidelines, these shriveled or puckered leaves are a definitive structural signal that the plant has drawn down its stored water and is ready for a deep soak. This is the cue to check substrate dryness and water if confirmed dry.
- Leaves bending or drooping at the base without color change: Often a structural/light issue (etiolation from insufficient light, discussed in the metrics table above) rather than a hydration issue—distinguish by checking whether the leaf tissue itself feels firm (light issue) or soft (hydration or rot issue)
Winter dormancy substantially extends the dry interval. As ambient light levels and temperatures drop, Aloe vera’s metabolic rate slows and gel reserve depletion rate decreases correspondingly—a substrate that dried in 2-3 weeks during summer may take 5-6 weeks or longer in winter. Continuing a summer watering frequency through winter is one of the most common causes of cold-season root rot, because the combination of slower drying, lower light, and cooler root-zone temperatures compounds to keep substrate wet far longer than the same watering volume would in summer.
Propagating Aloe Vera Offsets (“Pups”)
A healthy, mature Aloe vera rosette continuously produces genetically identical clonal offsets—called “pups” or offsets—from lateral buds at its base, providing an essentially unlimited propagation source once the correct separation and callusing protocol is followed.
The Offset Lifecycle
Pups emerge as small rosettes growing from short rhizome connections at the base of the parent plant, each one a genetic clone sharing the parent’s root system initially before developing independent roots of its own as it matures. Left undisturbed, a single parent plant can produce a dense cluster of multiple generations of offsets—useful for naturalized outdoor plantings but often undesirable in container culture where competition for the limited substrate volume reduces vigor across the whole cluster.
✅ THE PUP SEPARATION AND CALLUS PROTOCOL
- Confirm size threshold: Wait until the pup reaches at least one-fifth the size of the parent rosette. Smaller pups have minimal independent root development and a high failure rate when separated prematurely
- Remove the entire plant from its pot: Extract the full root mass to expose the rhizome connection between parent and pup. Gently brush away dry substrate—do not hose down or wash the roots, which is unnecessary for this dry-substrate species and only prolongs the time roots spend wet
- Sever with a sterilized blade: Using a knife or pruning blade cleaned with 70% isopropyl alcohol, cut the connecting rhizome cleanly, ensuring the pup retains its own root section. A clean single cut minimizes tissue damage on both the pup and the parent’s remaining root system
- The callus window (the step most guides skip entirely): Place the separated pup in a dry, shaded location—out of direct sun but with good airflow—for 2-3 days, until the raw cut surface forms a dry, papery callus. This callus is the plant’s natural wound-sealing response and is the single barrier preventing soil-borne fungal and bacterial pathogens from entering the vascular tissue through the fresh cut. Planting an uncallused cut directly into moist substrate is the most common cause of post-propagation rot in otherwise correctly-executed separations
- Pot in dry substrate, then wait: Plant the callused pup into dry 1:1:1 aggregate mix. Do not water immediately—wait an additional 5-7 days before the first light watering, allowing new root initiation to begin in dry conditions. Watering too soon after potting re-creates the wet-wound exposure the callus period was designed to prevent
Harvesting Aloe Vera Gel Safely
The clear, soothing gel associated with Aloe vera‘s topical uses sits beneath a layer of bright yellow latex—aloin—that must be deliberately drained and discarded before the gel is used, a step that most informal harvesting guides omit entirely.
Leaf Selection and the Aloin Drain
🔬 SAFE GEL HARVESTING PROTOCOL
- Select outer, mature leaves only: Harvest from the thickest, most mature leaves at the outer base of the rosette—these contain the most developed gel reserves. Never harvest from the central crown or newly-emerging leaves, which are critical to the plant’s continued growth and structurally vulnerable to the kind of damage that invites crown rot
- Cut close to the stem: Using a clean, sharp blade, slice the leaf as close to its point of attachment at the stem as possible—a longer remaining stub on the plant is more prone to desiccation and dieback than a clean close cut
- Drain the aloin: Immediately stand the cut leaf upright, cut-end down, in a small glass or bowl for 10-15 minutes. This allows the sticky, bright yellow latex—aloin—to drain freely from the vascular bundles just beneath the leaf rind. Aloin is a potent skin irritant and laxative compound; it is chemically distinct from the clear inner gel and must not be incorporated into any topical preparation
- Discard the drained aloin completely: The yellow liquid collected during the drain period should be discarded—do not attempt to use it. Rinse the cut end of the leaf briefly if any yellow residue remains visible at the cut surface before proceeding
- Fillet and scrape the clear gel: Once drained, slice the leaf lengthwise along both flat sides to remove the rind, exposing the clear inner gel (parenchyma tissue). Scrape or scoop the gel away from the rind for use
⚠️ ALOIN TOXICITY — PETS AND ORAL CONSUMPTION
The aloin-containing rind and latex are the basis of Aloe vera‘s ASPCA toxicity classification for cats and dogs—ingestion of leaf material (not the drained clear gel, but whole-leaf chewing) causes vomiting, diarrhea, and lethargy in pets due to saponins and anthraquinone glycosides in the rind layer. Keep plants positioned out of reach of pets prone to chewing foliage, and never offer drained aloin liquid or unprocessed leaf material to animals or humans as an oral product.
The Diagnostic Failure Matrix
The majority of Aloe vera care problems present as one of four visually distinct symptom patterns—each mapping to a specific causal mechanism with a specific, non-interchangeable corrective protocol.
| Visual Symptom | Probable Root-Cause Mechanism | Corrective Clinical Protocol |
|---|---|---|
| Leaves soft, soggy, translucent, or dropping off | Over-watering / early-stage root rot. Cells in waterlogged leaf tissue have absorbed excess moisture beyond storage capacity and ruptured. Roots in saturated substrate are simultaneously suffocating from lack of oxygen. | Stop watering immediately. Remove from pot, cut away mushy brown or black roots with a sterilized blade, allow root ball to dry 24-48 hours, repot in fresh dry 1:1:1 aggregate. Resume watering at half the previous frequency using soak-and-dry. See root rot surgical debridement protocol for advanced cases with extensive root loss. |
| Leaves thin, flat, curling inward, or puckered | Under-watering / dehydration. The plant has drawn down its internal gel reserves stored in leaf parenchyma below the threshold that maintains normal turgor and shape. | Administer a thorough, deep soak until water runs freely from drainage holes. Leaves should return to plump, rigid form within 24-48 hours as parenchyma cells rehydrate. If no recovery within 72 hours, check root health—severely desiccated root systems may need time to resume uptake function. |
| Leaves turning dull orange-brown or gray | Sun scorch / light shock. The plant has been moved abruptly into direct, intense sunlight without a gradual acclimation period—UV and heat exceed the photoprotective capacity the existing tissue had developed under previous (lower) light conditions. | Move the plant slightly back from direct window glass, or provide shade during peak midday hours for outdoor specimens. Color typically reverts toward green as stress diminishes over 1-2 weeks. For future relocations: increase light exposure incrementally over 7-10 days rather than moving directly into full sun. |
| Center of the rosette turns black and collapses | Crown rot. Water was poured directly into the top center of the plant and pooled in the leaf crevices around the growing point, creating sustained moisture contact with the most metabolically active and least protected tissue—inviting rapid fungal/bacterial decay. | Usually fatal to the central growing point. If outer leaves remain firm and healthy, harvest them for gel use or remove offsets/pups for propagation as salvage. Going forward: water the substrate directly at the base, never pour water over or into the rosette itself. |
| Small cottony white masses in leaf-base axils; sticky residue on leaves | Mealybug infestation. The tightly-overlapping leaf bases at the rosette center provide a protected microhabitat that mealybugs colonize readily, particularly on stressed or slow-growing specimens. | Manual removal with isopropyl-alcohol-soaked cotton swab for visible colonies. For persistent infestations, apply emulsified neem oil per the azadirachtin IGR protocol—evening application, 3 treatments at 7-day intervals, applied to substrate-adjacent leaf bases with minimal runoff into the crown. |
Frequently Asked Questions
Why are my aloe vera leaves turning brown, mushy, or translucent?
Soft, soggy, or translucent leaves are the signature presentation of over-watering and early-stage root rot. Aloe vera stores water in specialized leaf parenchyma cells—in waterlogged conditions, these cells absorb moisture beyond their storage capacity and rupture, producing the translucent, mushy texture. Simultaneously, roots sitting in saturated 1:1:1 aggregate (or worse, in denser unamended soil) are deprived of oxygen and begin to decay, compounding the issue. Correct response: stop watering entirely, remove the plant from its pot, cut away any brown or black mushy roots with a sterilized blade, let the remaining root ball air-dry for 24-48 hours, then repot into fresh dry aggregate mix. Resume watering at roughly half the previous frequency, strictly using the soak-and-dry method—full saturation followed by complete drying before the next watering, with no intermediate top-ups.
How often should I water aloe vera?
There is no calendar answer—correct Aloe vera care means watering only when the substrate is completely dry from top to bottom, which is typically every 2-3 weeks indoors during active growth and considerably less often in winter. Confirm dryness by inserting a finger or wooden skewer to the full pot depth—surface dryness alone is unreliable, especially in non-porous containers. When watering, saturate thoroughly until water runs freely from the drainage holes, then do not water again until the substrate is fully dry once more. Leaf appearance provides a secondary gauge: plump, rigid, slightly convex leaves mean the plant is adequately hydrated and needs nothing; thin, flat, or visibly puckered leaves signal that internal gel reserves are depleted and the next soak-and-dry cycle is due. Winter dormancy can extend the dry interval to 5-6 weeks or longer—continuing a summer watering frequency through winter is one of the most common causes of cold-season root rot.
Is aloe vera toxic to cats and dogs?
Yes—the ASPCA classifies Aloe vera as toxic to cats, dogs, and horses if ingested. The toxicity comes from saponins and anthraquinone glycosides—including aloin, the bitter yellow latex found in the rind layer just beneath the leaf surface—which cause vomiting, diarrhea, lethargy, and changes in urine color in pets that chew on leaf material. This is distinct from the clear inner gel used in topical products; the toxicity risk applies specifically to whole-leaf or rind consumption where aloin is present. Position plants out of reach of pets prone to chewing foliage. If ingestion occurs, contact ASPCA Animal Poison Control (888-426-4435) or a veterinarian—symptoms are typically self-limiting in small ingestion amounts but should be monitored.
The Lab Verdict: Drainage and Dormancy Over Diligence
The paradox at the center of Aloe vera care is that the most common failures come from attentive growers doing more, not less—watering on a reassuring schedule, “helping” with extra moisture during what feels like a dry spell, choosing containers that retain visible moisture longer so the plant “looks cared for.” Every one of these well-intentioned behaviors works directly against a CAM physiology that evolved to thrive on scarcity and punishes abundance with root zone hypoxia and crown rot.
The 1:1:1 aggregate substrate and unglazed terracotta container are not aesthetic choices—they are the drainage infrastructure that makes the soak-and-dry watering method viable at all. Without that infrastructure, even disciplined watering intervals leave the root zone in saturated conditions far longer than this species tolerates. With it, the binary soak-and-dry rhythm becomes simple to execute and nearly impossible to get wrong: water thoroughly, then leave it alone until the leaves and the substrate both confirm it’s time again.
Propagation and harvesting follow the same underlying logic of respecting the plant’s defenses rather than working around them. The callus window before potting a separated pup is the plant’s own wound-sealing mechanism, given time to function. The aloin drain before using harvested gel is simply removing the compound the plant produces specifically to deter the kind of consumption that harvesting represents. Aloe vera is not a demanding plant—it is a plant whose demands are almost entirely about restraint, and Aloe vera care done correctly looks, from the outside, like doing very little, very precisely, on a schedule the plant itself reveals through its own leaves.
The Lab | Arid Succulent Physiology & CAM Metabolism Division
Aloe Vera (Aloe barbadensis Miller) Care Protocol | Published: March 2026