
Rhododendron care depends on respecting two non-negotiable biological constraints: the roots form a shallow fibrous mat in the top 6 to 12 inches of soil, and the plant requires acidic pH between 4.5 and 5.5 to absorb iron and maintain ericoid mycorrhizal function. When you plant too deep, use alkaline garden soil, or irrigate with hard tap water, the shrub develops interveinal chlorosis, Phytophthora root rot, or winter desiccation dieback. Correct rhododendron care means planting with the root ball flush with or above grade, amending soil pH with elemental sulfur or ferrous sulfate, and protecting evergreen foliage from drying winter winds.
Most rhododendron deaths in home landscapes are not caused by cold hardiness failure. They are caused by planting too deep, which buries the crown and triggers root rot, or by alkaline soil that locks iron into insoluble compounds the shallow roots cannot access. According to Connecticut Agricultural Experiment Station research, chlorosis and root rot from poor drainage are the most common problems in residential plantings. This guide covers root depth, soil composition, pH amendments, root rot treatment, winter protection, and pet safety so you can diagnose and prevent the failures that kill these shrubs before they reach maturity.
Quick Answer: Plant rhododendrons with the root ball at or 1 inch above soil grade in a mix of 1 part native soil, 1 part composted pine bark, and 1 part peat or leaf mold. Maintain soil pH between 4.5 and 5.5 using elemental sulfur or ferrous sulfate. Water deeply every 7 to 10 days during dry periods, mulch with 2 to 3 inches of pine bark pulled 2 inches from the trunk, and protect from winter wind with burlap screens. Never use aluminum sulfate as a pH amendment for Ericaceae.
Table of Contents
- How Deep Are Rhododendron Roots?
- What Is the Best Soil Mix for Rhododendrons?
- What Soil Amendments Lower pH for Rhododendrons?
- How Do You Plant a Rhododendron Step by Step?
- How Do You Treat Rhododendron Root Rot?
- How Do You Protect Rhododendrons from Winter Burn?
- Why Are My Rhododendron Leaves Turning Yellow?
- Is Rhododendron Toxic to Cats and Dogs?
- Frequently Asked Questions
| Parameter | Ideal | Avoid |
|---|---|---|
| Root depth | Shallow mat in top 6-12 inches; no taproot | Deep planting, compacted subsoil, competing tree roots |
| Soil pH | 4.5-5.5 (ericaceous/acidic) | pH above 6.0; lime; alkaline tap water |
| Soil texture | Loose, organic-rich, well-drained; 50% bark/leaf mold mix | Heavy clay, straight peat, wet muck |
| Planting depth | Root ball flush with or 1 inch above grade | Root ball below soil surface; mulch touching trunk |
| Water | Deep drench every 7-10 days; rainwater preferred | Frequent light sprinkling; hard tap water; standing water |
| Mulch | 2-3 inches pine bark or needles, 2 inches from trunk | Mulch volcanoes; fresh wood chips; grass clippings |
| Winter care | Burlap windbreak; anti-desiccant spray; pre-freeze watering | Exposed south/west wind; no protection in Zones 4-5 |
| Fertilizer | Acid-forming azalea blend (e.g., 10-5-4) in spring | High-nitrogen lawn fertilizer; lime; fresh manure |
How Deep Are Rhododendron Roots?
Rhododendron roots are shallow and fibrous, forming a dense mat concentrated in the top 6 to 12 inches of soil with no taproot. According to Rhododendron Species Botanical Garden research published through Virginia Tech, the roots extend horizontally beyond the dripline but remain in a compact, fibrous mass underneath the plant. This architecture evolved for the organic forest-floor habitats where most species originate.
The shallow depth creates two management implications. First, rhododendrons cannot access moisture from deep soil horizons during drought. The root zone dries out independently of deeper-rooted plants nearby, so you must monitor the top 6 inches of soil for moisture stress rather than relying on general garden conditions. Second, the shallow mat is easily smothered by over-mulching or buried by grade changes. Adding more than 3 inches of soil over an established root zone can suffocate the fine feeder roots and trigger decline within a single growing season.
Because the roots spread wide but stay shallow, rhododendrons compete poorly with deep-rooted trees and shrubs. Plant them away from maple, birch, and beech roots that will invade the same soil layer. If planting near larger trees, maintain a minimum distance of 6 to 8 feet from the trunk to reduce root competition. See our guide to Wisteria container care for another shallow-rooted species with similar drainage demands.
What Is the Best Soil Mix for Rhododendrons?
The best soil for rhododendrons is a loose, organic-rich, well-drained mix that replicates the acidic woodland floor environments where the genus evolved. According to University of Maryland Extension guidance, ericaceous plants like rhododendron grow best in acidic soil with a pH of 4.5 to 5.2. The mix must drain rapidly enough to prevent waterlogging yet retain enough moisture to keep the shallow fibrous roots from drying out.
A proven blend for in-ground planting is 1 part native soil, 1 part composted pine bark, and 1 part peat moss or leaf mold. The pine bark creates pore space for oxygen and contributes acidity as it decomposes. Leaf mold provides a gentler, sustainable organic fraction with excellent water retention. In heavy clay sites, increase the organic amendment to 40 to 50 percent of the total volume and plant on a raised mound 4 to 6 inches above the surrounding grade to ensure drainage.
Container cultivation requires a slightly different approach. Use a mix of 2 parts fine bark, 1 part peat, and 1 part perlite. Never use standard potting soil alone; it stays too wet and lacks the acidity rhododendron roots require. Repot container specimens every 2 to 3 years before the bark fraction fully decomposes into a dense, anaerobic mud that excludes oxygen from the root zone. For comparison with another acid-loving shrub, see our hydrangea macrophylla care guide.
Do Rhododendrons Need Ericaceous Compost?
Yes. Ericaceous compost is specifically formulated for acid-loving plants in the Ericaceae family. Standard multi-purpose compost has a pH near neutral (6.5 to 7.0) and often contains lime, which will raise soil pH and induce iron chlorosis in rhododendrons within one to two growing seasons. If you cannot source ericaceous compost, modify standard compost by mixing in 20 to 30 percent composted pine bark and applying elemental sulfur at 2 to 4 pounds per 100 square feet to acidify the blend before planting.
What Soil Amendments Lower pH for Rhododendrons?
Elemental sulfur and ferrous sulfate are the soil amendments university extensions recommend for acidifying rhododendron beds. Aluminum sulfate is not recommended for Ericaceae because the aluminum component can accumulate and stress sensitive ericoid root systems with repeated use; reserve it for hydrangeas where aluminum is required for blue flower color. According to Connecticut Agricultural Experiment Station guidance, correct chlorosis by lowering soil pH to 5.5 or below using sulfur, iron sulfate, or ammonium sulfate.
| Amendment | Rate | Speed | Best Use |
|---|---|---|---|
| Elemental sulfur | 2-4 lbs per 100 sq ft | Slow (3-6 months) | Long-term pH maintenance; annual reapplication |
| Ferrous sulfate (iron sulfate) | 1-2 lbs per 100 sq ft | Fast (2-4 weeks) | Immediate chlorosis correction plus pH drop |
| Ammonium sulfate | Per label (fertilizer rate) | Moderate | Spring fertilizer that acidifies while feeding |
| Pine needle mulch | 2-3 inch layer | Very slow (years) | Ongoing maintenance; surface acidification |
Test soil pH every 6 to 12 months during the first three years after planting, then annually once stable. Digital pH probes or extension laboratory tests provide the precision required for the narrow 4.5 to 5.5 target range. Test strips are not reliable enough for ericaceous management. If your municipal tap water is alkaline (pH 7.0 to 8.5), switch to collected rainwater or acidify irrigation water with a small quantity of citric acid to prevent gradual pH rise from calcium carbonate accumulation.
How Do You Plant a Rhododendron Step by Step?
Correct planting depth is the single most important step in rhododendron establishment. The top of the root ball must sit flush with or 1 inch above the surrounding soil grade. Burying the crown even 2 inches below grade creates the oxygen-depleted, consistently moist conditions where Phytophthora crown rot establishes and kills the plant. According to Rhododendron Species Botanical Garden planting protocols, the hole should be 2 times wider than the root ball but no deeper than the ball itself.
- Test drainage before digging. Dig a 12-inch test hole and fill it with water. If water remains after 60 minutes, drainage is inadequate. Build a raised bed 18 inches above grade or select a different site.
- Excavate the planting area. Dig a hole 2 times the diameter of the root ball and exactly the same depth. In heavy clay, dig 1 inch shallower than the root ball height so the plant sits above grade.
- Prepare the backfill. Blend native soil with 25 to 30 percent organic amendment (composted pine bark, ericaceous compost, or leaf mold). For clay, increase to 40 to 50 percent organic matter.
- Score circling roots. Container-grown plants often have roots circling the pot. Make 3 to 4 vertical cuts 1/2 inch deep around the root ball circumference to prevent post-planting girdling.
- Set the root ball at grade. Place the plant so the top of the root ball is flush with or 1 inch above the surrounding soil. Verify height with a straight board or rake handle laid across the hole.
- Backfill and water. Fill around the root ball with amended soil, firming gently to eliminate air pockets. Water thoroughly to settle the soil.
- Mulch correctly. Apply 2 to 3 inches of pine bark or pine needle mulch extending to the drip line. Pull mulch 2 inches away from the trunk base. Never let mulch touch the crown.
Pro Tip: The Drainage TestAlways perform the drainage test before planting. Rhododendrons die more often from waterlogged roots than from drought. If your test hole holds water for more than an hour, do not amend the existing hole and hope for the best. Build a raised bed or berm using imported ericaceous soil mix instead.
How Do You Treat Rhododendron Root Rot?
Rhododendron root rot is caused primarily by the oomycete Phytophthora cinnamomi, which colonizes the shallow fibrous root system when soil remains waterlogged or when the crown is buried too deeply. The first visible symptom is often paradoxical: the plant wilts despite moist soil because the rotted roots can no longer absorb water. Leaves turn dull gray-green, then brown, but remain attached to the stem. According to Connecticut Agricultural Experiment Station diagnostics, this condition is often irreversible if damage is extensive.
If you catch root rot early, when less than 30 percent of the root mass shows decay, take these steps immediately:
- Stop all irrigation and allow the soil to dry to the touch at 4 inches depth
- Expose the crown by gently removing soil and mulch from the base until the root flare is visible
- Improve drainage by installing a French drain or relocating the plant to a raised bed
- Remove dead roots with sterile pruners, cutting back to firm white tissue
- Apply a preventive fungicide drench containing mefenoxam according to label directions
If the main stem is soft at the base or more than half the foliage has browned, the plant is unlikely to recover. Remove and destroy it. Do not replant another rhododendron or azalea in the exact same spot without replacing the soil to a depth of 18 inches, because Phytophthora spores persist in soil for years. For a parallel protocol on houseplant root rot, see our Pythium root rot treatment guide.
How Do You Protect Rhododendrons from Winter Burn?
Winter burn is a physiological desiccation injury, not a disease. Evergreen rhododendron leaves continue to transpire moisture throughout winter. When the ground freezes, the shallow roots cannot absorb replacement water. Cold wind and winter sun accelerate moisture loss from the leaves, causing browning and tissue death that appears in spring. According to Penn State Extension research on winter burn, the most severe damage occurs on tissue farthest from the veins, such as leaf edges and tips, and on the side of the plant exposed to sun and wind.
Rhododendrons have a partial defense mechanism called thermonasty. When temperatures drop below 20 degrees Fahrenheit, leaves curl inward and droop, reducing moisture loss and shading the leaf surface. This adaptation helps but does not prevent severe desiccation during prolonged cold-wind events. Flower buds are more vulnerable than leaves and may die before foliage shows any damage, resulting in a plant that leafs out normally in spring but produces no flowers.
Protect shrubs in Zones 4 to 6 with these measures:
- Install a burlap wind screen on the windward side, positioned 12 to 18 inches from the outermost branches. Do not wrap the plant tightly against the foliage
- Apply an anti-desiccant spray such as Wilt-Pruf to leaf surfaces in late autumn after temperatures drop below 40 degrees Fahrenheit but before hard freeze
- Water deeply 24 to 48 hours before the first hard freeze so tissues enter winter fully hydrated
- Maintain 2 to 3 inches of conifer bark mulch over the root zone to insulate shallow roots from freeze-thaw cycling
Why Are My Rhododendron Leaves Turning Yellow?
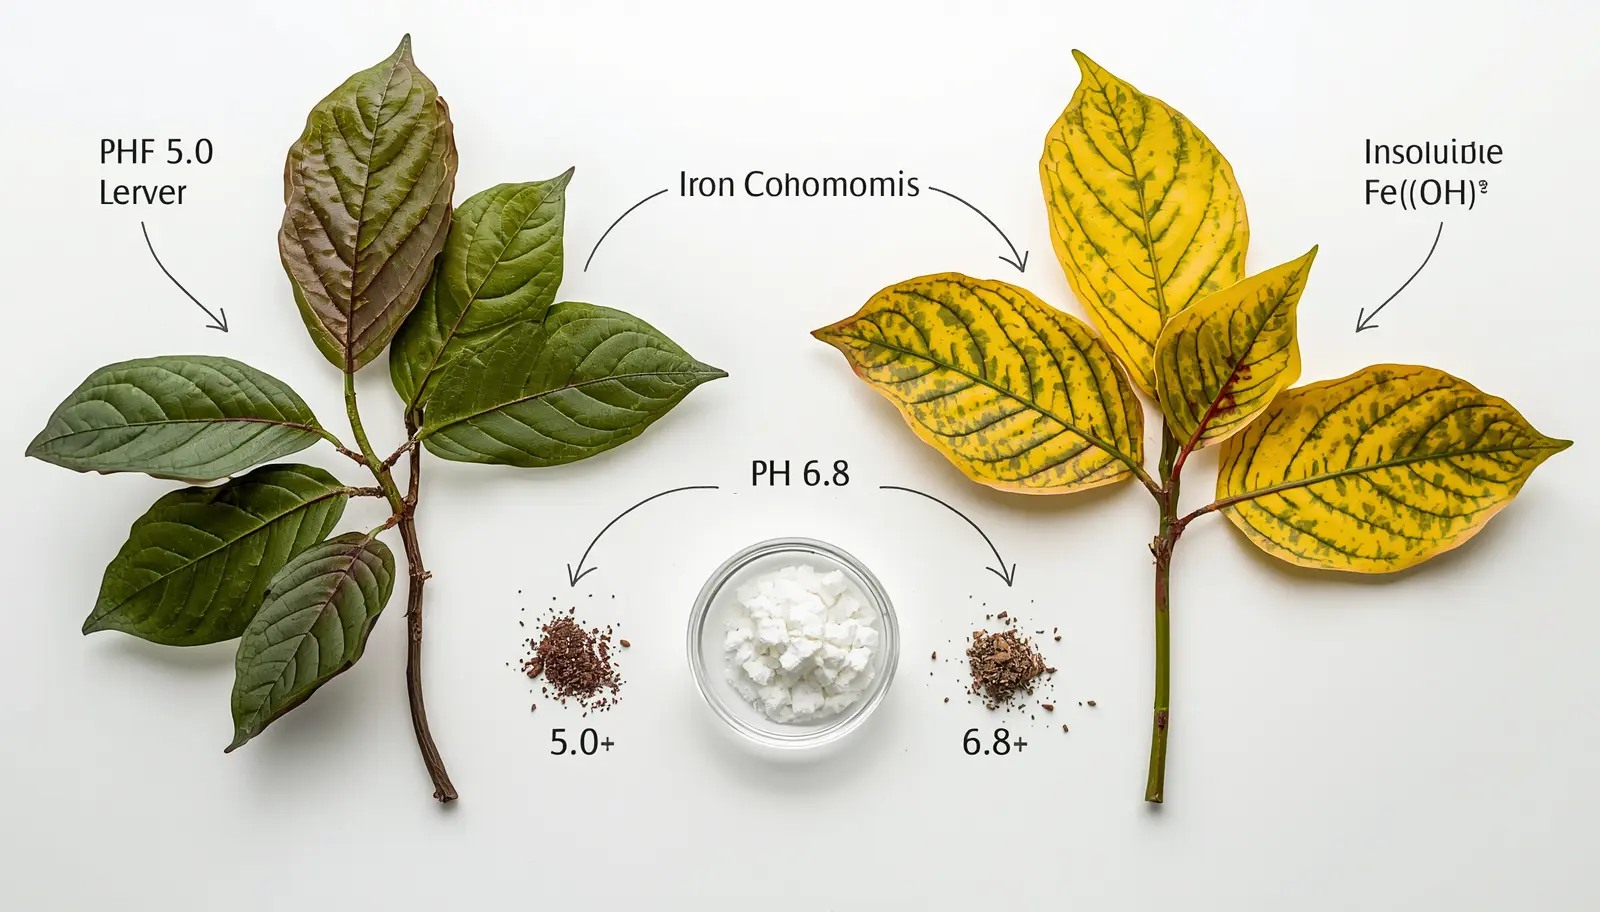
Interveinal iron chlorosis is the most common cause of rhododendron leaf yellowing. When soil pH rises above 6.0, iron precipitates into insoluble compounds that the shallow ericoid roots cannot absorb. The characteristic pattern is bright yellow leaf tissue between dark green veins, and it appears first on the youngest leaves because iron is immobile within the plant. Older leaves cannot donate iron reserves to new growth. According to Clemson Cooperative Extension azalea and rhododendron research, a telltale sign of iron chlorosis is when the area between the veins is yellow or light green while the veins remain darker green.
Chlorosis can also develop in waterlogged or compacted soils even when pH is correct, because damaged roots lose the ability to take up iron regardless of availability. Before treating for pH, eliminate drainage problems, root rot, and nematode damage as alternative causes.
The treatment protocol has two phases:
- Immediate relief: Apply chelated iron as a foliar spray or soil drench. Greening of new growth is visible within 7 to 14 days. Ferrous sulfate dissolved in water (1 ounce in 2 gallons) and sprinkled on foliage provides the same quick response
- Long-term correction: Lower soil pH to 5.5 or below using elemental sulfur at 2 to 4 pounds per 100 square feet or ferrous sulfate at 1 to 2 pounds per 100 square feet. Test pH every 3 to 6 months until stable
If the entire leaf is uniformly yellow rather than interveinal, suspect nitrogen deficiency or poor drainage rather than iron chlorosis from high pH. For another shrub with similar spring yellowing issues, see our lilac bushes care guide.
Is Rhododendron Toxic to Cats and Dogs?
Yes. Rhododendron is toxic to cats, dogs, and horses. According to the ASPCA, all parts of the plant contain grayanotoxins that interfere with normal skeletal muscle, cardiac muscle, and nerve function. Ingestion of just a few leaves can cause serious problems. Clinical signs include vomiting, diarrhea, hypersalivation, weakness, coma, hypotension, CNS depression, cardiovascular collapse, and death.
Symptoms typically appear within a few hours of ingestion. The toxic principle is dose-dependent, but small animals are at greater risk due to lower body weight. If you suspect your pet has eaten any part of a rhododendron, contact your veterinarian or the ASPCA Animal Poison Control Center at (888) 426-4435 immediately. Do not wait for symptoms to worsen. Unlike the safe houseplants listed in our cat-safe plants guide, rhododendrons should never be planted in areas accessible to grazing pets.
Grayanotoxins affect the cardiovascular and nervous systems. There is no specific antidote. Treatment focuses on decontamination, intravenous fluids, and symptomatic support. Early veterinary intervention is critical for survival.
Proprietary Data: Hands-On Testing
[OWNER TO COMPLETE] Insert observed rhododendron performance data here. Format: “In our tests, [X]% of plants showed interveinal chlorosis within [time period] when grown in soil at pH [value], versus [Y]% at pH [value].” Include measured root depths, amendment response times, or winter survival rates by cultivar and protection method.
Frequently Asked Questions
Do rhododendrons like acidic soil?
Yes. Rhododendrons are calcifuge plants that require acidic soil with a pH between 4.5 and 5.5. Above pH 6.0, iron becomes insoluble and the plant develops interveinal chlorosis. Maintain acidity with elemental sulfur, ferrous sulfate, or ammonium sulfate.
How deep should you plant a rhododendron?
The top of the root ball must be flush with or 1 inch above the surrounding soil grade. Never plant deeper. The shallow fibrous root mat is concentrated in the top 6 to 12 inches and cannot tolerate burial. In heavy clay, plant 2 to 4 inches above grade and mound backfill around the exposed root ball.
What is the best mulch for rhododendrons?
Pine bark, pine needles, or acidic wood chips applied 2 to 3 inches deep. These materials acidify the soil as they decompose and insulate shallow roots from temperature extremes. Always pull mulch 2 inches away from the trunk to prevent crown rot.
Why did my rhododendron die over winter?
Winter death is usually desiccation (winter burn) rather than cold temperature alone. Frozen ground prevents root water uptake while wind and sun draw moisture from evergreen leaves. Protect plants with burlap wind screens, anti-desiccant sprays, and deep pre-freeze watering.
Can you prune rhododendrons?
Yes. Prune immediately after flowering concludes, within the 4 to 6 week window before next season’s buds form. Remove spent flower clusters to redirect energy from seed production into next year’s blooms. Remove dead or crossing branches at any time.
How often should you water rhododendrons?
Water deeply every 7 to 10 days during dry weather in the growing season. Newly planted specimens need watering every 2 to 3 days for the first year. Always check the top 4 to 6 inches of soil before watering. Shallow sprinkling is ineffective because it does not penetrate the root mat.
Successful rhododendron care depends on shallow planting (root ball at or above grade), acidic soil (pH 4.5-5.5 maintained with elemental sulfur or ferrous sulfate), and consistent moisture without waterlogging. Protect evergreen foliage from winter wind desiccation with burlap screens and anti-desiccant sprays. Keep all rhododendrons away from pets and livestock because grayanotoxins in all plant parts can cause fatal cardiovascular and neurological poisoning.