
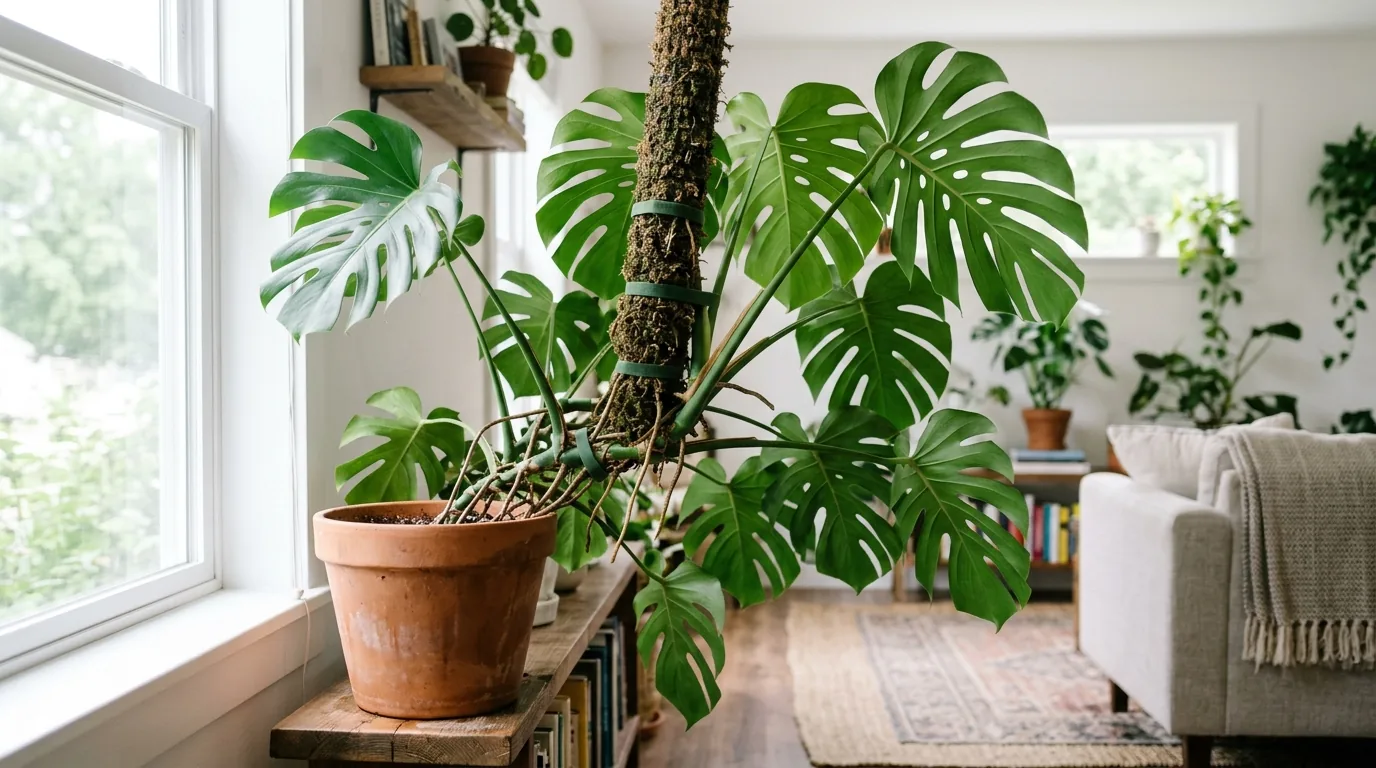
Monsteras, pothos and climbing philodendrons are climbers in nature. The RHS explains that in the wild they produce roots from their stems that attach onto trees, and that indoors they benefit from being trained or tied onto a moss pole, which their stems root into if the moss is kept moist. This guide covers what a moss pole does, which plants need one, how to make a moss pole, how to use a moss pole for monstera and a moss pole for pothos, moss pole vs coco coir pole, and upkeep, following the RHS, NC State Extension, Clemson HGIC and the CDC.
What a Moss Pole Does
| Benefit | What the sources say |
|---|---|
| Something to root into | Climbers root into the pole if the moss is kept moist (RHS) |
| Support for heavy plants | Swiss cheese plants become top-heavy as they grow (RHS); sturdy support prevents stems breaking (NC State) |
| Larger, more mature leaves | Once a monstera feels it is climbing, it often makes larger, more holed leaves (RHS); pothos with support and light produces larger, mature leaves (NC State); climbing can bring larger leaves with holes, depending on variety (Clemson) |
| A neater shape | Upright growth instead of sprawling stems |
Sources: RHS; NC State Extension; Clemson HGIC 1568.
NC State describes Monstera deliciosa as starting on the ground and turning epiphytic once it reaches a tree it can climb, and notes that only mature leaves develop the holes. A pole indoors mimics that tree. It is not magic, though: the RHS also says that in very low light monstera leaves tend to have fewer holes, so light matters as much as the pole (see our guide to monstera light requirements).
Which Plants Need a Moss Pole
| Plant | Climber? | Source | Care guide |
|---|---|---|---|
| Monstera deliciosa | Yes; benefits from a moss pole | RHS, NC State | Monstera deliciosa care |
| Monstera adansonii | Yes; NC State suggests a stake, trellis or moss pole in the center of the pot | NC State | Monstera adansonii care |
| Pothos (Epipremnum) | Yes; trails or climbs a moss pole | RHS, Clemson, NC State | Pothos care |
| Climbing philodendrons | Yes; best given support | RHS | Heartleaf philodendron, Philodendron micans |
| Bushy philodendrons | No; don’t generally need support | RHS | No pole needed |
| Anthurium crystallinum | Can climb to about 50 cm | RHS | Anthurium crystallinum care |
Sources: RHS growing guides and “Monsteras and more”; NC State Extension Plant Toolbox; Clemson HGIC 1568.
The RHS draws the line clearly for philodendrons: climbing types are best given support, while bushy species don’t generally need pruning, training or support. Trailing plants such as pothos and heartleaf philodendron can go either way, hanging from a basket or climbing a pole.
Moss Pole vs Coco Coir Pole (and Other Supports)
| Support | How it works | Notes |
|---|---|---|
| Sphagnum moss pole | Holds moisture so aerial roots can grow into it | The RHS describes climbers rooting into a moss pole kept moist; wear gloves when handling sphagnum (CDC) |
| Coco coir pole | Coir-wrapped stake the plant clings to | The RHS lists moss- or coir-covered poles as options for epipremnum and says to keep the covering damp so stems attach |
| Stake or trellis | Physical support only; stems are tied on | NC State lists a stake or trellis as alternatives for Monstera adansonii |
Sources: RHS; NC State Extension; CDC.
We found no extension or university comparison of moss and coir poles. What the RHS stresses for both is the same: keep the covering damp so the stems attach. Without a published comparison, the deciding factor is practical: pick the covering you will actually keep damp. For the materials themselves, see our comparison of coco coir vs peat moss.
How to Make a Moss Pole
Extension services don’t publish build instructions, so what follows is the common homemade design rather than a tested recipe. It has three parts: a rigid core, a mesh tube, and damp moss inside.
- Gather materials: a stake or length of pipe as the core (wood, bamboo or PVC), plastic garden mesh or chicken wire, sphagnum moss, cable ties or garden wire, scissors or wire cutters, and gloves.
- Soak the moss in water until it is fully damp, then squeeze out the excess. Wear gloves: the CDC lists sphagnum moss as a source of the fungus that causes sporotrichosis and recommends gloves and long sleeves when handling it.
- Cut the mesh to the length of the pole you want and wide enough to wrap around the core with room for moss. Fold back or file any sharp wire ends.
- Fill and close: lay the core on the mesh, pack damp moss around it, then roll the mesh into a tube and close the seam with ties every few inches.
- Leave the bottom end of the core bare so it can be pushed into the potting mix.
- Size it to the plant: the RHS says moss- or coir-covered poles for epipremnum are usually up to 1 m (3 1/3 ft) tall. Start a little taller than the plant and extend later (see below).
How to Add a Moss Pole to a Plant
- Do it at repotting time if you can, so the pole goes in before the roots fill the pot. The RHS says monsteras can usually stay in their pot for a year or two, then be repotted every few years into a pot only a few centimetres larger. See our guide on how to repot a plant.
- Use a heavy pot. The RHS says the pot should be heavy enough to stop a monstera toppling; a tall, damp pole adds weight at the top.
- Place the pole at the back of the plant, on the side the stems lean toward, and push it down to the bottom of the pot. NC State suggests the center of the container for Monstera adansonii.
- Backfill with fresh mix, such as our aroid soil mix, and firm it around the pole.
- Tie the stems loosely to the pole with soft plant ties, velcro tape or twine, with the nodes and aerial roots facing the pole. Never tie tightly enough to pinch the stem.
- Wet the pole so the aerial roots have damp moss to grow into.
Moss Pole for Monstera
For Monstera deliciosa, the RHS says the plant benefits from being trained or tied onto a moss pole and that once it feels it is climbing, it often produces larger, more mature leaves with more holes. NC State adds that sturdy support is necessary to prevent the stems from breaking, and that indoor plants usually stay 6 to 8 feet tall. That means a monstera pole needs to be sturdy and well anchored, and it will likely need extending as the plant grows.
- Tie the main stem to the pole, with the side that carries the aerial roots facing it.
- Guide aerial roots onto the moss as they grow. Roots that miss the pole can be tucked into the moss or left to hang.
- Give it bright, indirect light: the RHS links very low light to fewer holes.
For Monstera adansonii, NC State suggests a stake, trellis or moss pole in the center of the container, and says that with a trellis or moss pole an indoor plant can reach 3 to 8 feet tall.
Moss Pole for Pothos
The RHS describes devil’s ivy (pothos) as a climbing vine that will trail or grow up a moss pole, and its epipremnum guide says to keep moss- or coir-covered poles damp so the stems attach. Clemson HGIC says a pothos on a pole can emulate its natural habit of wrapping around tree trunks, and recommends a moss pole for cultivars such as Dragon-Tail and Skeleton Key. NC State notes that with support and adequate light, pothos produces larger, mature leaves. Several stems can share one pole; wind them up and tie them so the nodes touch the moss. See our pothos care guide for everything else.
Keeping the Pole Damp and Extending It
- Moisture: the RHS says climbers root into the pole if the moss is kept moist. Water or mist the pole when it feels dry on the surface, more often in warm, dry rooms. Pouring a little water into the top of the pole lets it soak down through the moss.
- Don’t drown the pot: water running down the pole ends up in the potting mix, so check the mix before watering the plant as well. See our guide to overwatered vs underwatered plants.
- Humidity helps: a damp pole dries more slowly in humid air; in a dry home, a greenhouse cabinet or pebble tray helps.
- Extending: when the plant reaches the top, attach a second section above the first with ties or a connector, filled with damp moss in the same way, and keep tying the new growth on.
- Pruning: if a climber outgrows its space, the RHS suggests pruning in spring just after a leaf node, which also encourages fuller growth.
Problems and Fixes
| Problem | Likely cause | Fix |
|---|---|---|
| Aerial roots won’t grow into the pole | Pole too dry (RHS: keep it moist); nodes facing away | Wet the pole regularly; re-tie with nodes against the moss |
| New leaves are small, few holes | Low light (RHS); plant not yet climbing | More bright, indirect light; give it time on the pole |
| Plant and pole tipping over | Pot too light (RHS: use a heavy pot) | Move to a heavier pot; anchor the pole deeper |
| Mold on the moss surface | Constantly wet moss in still air | Let the surface dry slightly between wettings; improve air movement |
| Stems marked or pinched | Ties too tight | Loosen and use soft ties |
| Soggy potting mix, yellow leaves | Water from the pole running into the pot | Water the pole less heavily; check the mix before watering |
Sources: RHS; general care practice.
Frequently Asked Questions
Do monsteras need a moss pole?
They don’t need one to survive, but the RHS says Swiss cheese plants benefit from being trained onto a moss pole, and once a plant feels it is climbing it often produces larger, more mature leaves with more holes.
Is a moss pole better than a coco coir pole?
The RHS lists both moss- and coir-covered poles and says to keep either one damp so stems attach. We found no extension or university comparison of the two, so choose the one you will keep damp.
How do you make a moss pole?
The common design is a stake or pipe wrapped in a tube of plastic mesh or chicken wire packed with damp sphagnum moss and closed with ties, with the bottom of the stake left bare to push into the pot. Wear gloves when handling sphagnum (CDC).
How do you attach a plant to a moss pole?
Tie the stems loosely with soft plant ties or velcro, with the nodes and aerial roots facing the pole, then keep the pole damp so the roots grow into it (RHS).
How often should I water a moss pole?
Whenever the moss surface feels dry. The RHS only says to keep it moist; warm, dry rooms dry it faster than humid ones.
Can pothos climb a moss pole?
Yes. The RHS describes pothos as a climbing vine that can trail or grow up a moss pole, and Clemson says a pole lets it emulate its natural habit of wrapping around tree trunks.
When should I add a moss pole?
Ideally at repotting time, so the pole goes in before roots fill the pot. Use a heavy pot so the plant and pole don’t topple (RHS).
Sources
- RHS: How to grow Swiss cheese plants
- RHS: How to grow philodendrons
- RHS: How to grow epipremnum
- RHS: Monsteras and more, growing arum houseplants
- NC State Extension Gardener Plant Toolbox: Monstera deliciosa
- NC State Extension Gardener Plant Toolbox: Monstera adansonii
- NC State Extension Gardener Plant Toolbox: Epipremnum aureum
- Taylor, A. and Tanner, C. Clemson HGIC 1568: How to Grow Pothos Indoors (2026)
- CDC: Sporotrichosis Basics